Why isn’t the main element in Dreamweaver CC’s Insert panel?

One of the arguments Adobe uses to convince all of us that we want to fork over a monthly subscription fee for Adobe products is that we get all the latest updates.

So why isn’t the main element among the choices in the Insert panel?

The main element represents the main content of the body of a document or application. By definition, the main element is for grouping content; it is not considered sectioning content. (Sectioning content includes elements such as article, aside, and section which are expected to have headings and possibly navs and footers. Sectioning content shows up in the document outline. The main element does not show up in the document outline.)

Where would Dreamweaver put main?

Is main a structural element in the Dreamweaver menu system? It seems to me that when you are building a page in Dreamweaver by inserting structural elements one by one, the main element should be one of your choices.

Here’s what Dreamweaver CC currently has in the Structure category of the Insert menu.

The Structure category of DW's Insert panel
The Structure category of DW’s Insert panel

There are some helpful HTML5  choices in that menu such as article, section, header, and footer. Why not main? Aren’t we paying the big bucks every month to have the latest goodies at our fingertips? All the new HTML5 elements should be available to Dreamweaver CC users.

Tips on using the main element

The main element can only be used once on a page. The ARIA role="main" is implicit where the main element is used.

Educating Girls

In honor of Malala Yousafzai and her 17th birthday (June 12), GirlsWriteNow gave us this reminder that educating women will bring needed improvement all over the world.

Girls Write Now supports the idea that we are all Malala.

Other places where you can support the education of girls.


Contrast Ratio: A New Color Contrast Tool

Here’s a very nice new tool for checking color contrast against WCAG 2.0 standards for accessibility. It was created by Lea Verou and is called Contrast Ratio.

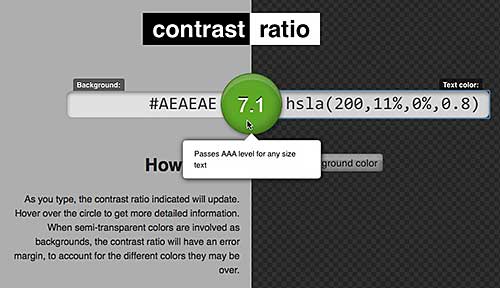
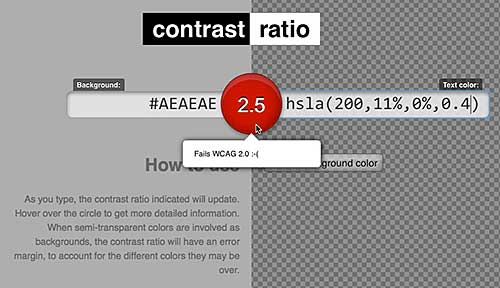
The tool allows you to swap text color and background color. It permits the use of transparency in both text color and background color. If your color choices fail to meet the WCAG 2.0 standards, the ratio button in the middle of the page turns red. Hovering over the button tells you how many, if any, of the WCAG 2.0 standards your colors meet.

Hover over the middle button to see how you're doing
Hover over the middle button to see how you’re doing

Bump up the level of opacity a bit on this color scheme and it passes.

A passing color ratio

Directions on the page explain some fancy ways to change the values for text and background colors. These are fun and time saving, but the real value in the tool comes from the clear and obvious way it reports on how the colors test out against WCAG 2.0 standards.

Why have a wrapper div?

Students may have a problem grasping is the need for a wrapper div. I frequently find myself explaining it numerous times until the message finally sinks in.

The metaphor I’ll use today will be to compare a wrapper div to a fence.

A wrapper div, or a container div, has no semantic meaning. It’s a generic container. Therefore, <div> is the proper tag. A <section> element should not be used as a container. [See: Sections and Articles are Not Generic Containers]

What does a fence do?

  • It demarks the edges of your property.
  • It contains animals or children within a prescribed area. It keeps them from getting out.
  • It creates a border between one area and another.
  • It can be plain or decorative.

A wrapper div in an HTML document does the same things but to a layout instead of to actual property.

  • The wrapper holds a design within certain boundaries.
  • The various areas of a design cannot escape from the boundaries set by the wrapper.
  • A max-width or min-width or varying width based on an @media query can be set for the wrapper that makes it size a design responsively.
  • The id identifying a wrapper provides a CSS hook which enables more than size constraints. Borders and other decorations can be added.

With a wrapper div in place, a layout can be centered on the page. The width of the design can be controlled for easier reading and line-length.

It’s necessary to create the wrapper with a div and an id:

<div id="wrapper">everything on the page goes in here</div>

One of the principles of HTML5 is to pave the existing cow paths. Hence we have all sorts of new semantic elements like header, main, and footer that were once created using the same div with an id technique.

If wrappers are so great, why isn’t there a new HTML5 element called wrapper? I don’t know the answer for sure, but I’m guessing it’s because a wrapper is not a semantic element. It’s merely a container, a boundary into which you place all your semantic content.

By the same token, there is no ARIA landmark role for wrapper or container divs. The container carries no semantic meaning, it just puts a fence around the content. There’s no need to indicate it as a landmark on the page.

3 Ways to Add Instagram to a WordPress Blog

There are several choices open to you if you want to bring in your photos from Instagram into a WordPress blog: You can add a badge from Instagram, use embedding, or choose from a number of plugins.

How to Add Instagram to Your WordPress Blog

Place an Instagram Badge on Your Site

Sign in to your account on Instagram. There’s a “badges” option in the menu. A badge will put an icon on your site that links to your Instagram URL. It doesn’t bring in any images.

Instagram badges

Select a badge type and copy the code. I selected an icon, copied the code, and pasted it into Text view in a post. What showed up was a nifty little Instagram icon that linked to my feed on Instagram.com.

If I wanted this type of Instagram badge on my blog, I’d paste the code into a text widget in my sidebar, near my other social media badges and buttons. It doesn’t make much sense to put this icon in a post, because it will get buried over time.

Embed a Single Photo

You can put a single Instagram photo into a blog post using the Instagram “embed” option. Find the icon showing three dots next to the comment box and click it to see the embed option.

Embed a single Instagram photo

Instagram gives you the option to embed a single photo. Copy that code and paste it into the Text view of your post, and the photo will show up.

Instagram’s embed feature allows you to embed other people’s photos in your blog as well. The link to the original image on Instagram is included in the embed code, and shows up when you hover over the word “Instagram.”

Having this link included with the image skirts copyright problems by linking directly to the photo on the Instagram feed of the creator of the image.

WordPress Plugins

With a plugin, you get more than just an occasional image to insert into a post. There are plugins to create image sliders, to back up your Instagram photos to your WordPress database, or to place a small gallery of photos in your sidebar; others do even more. Most of the plugins below only require your Instagram username to work. The last one I mention gives you the option to set it up using the Instagram API.

DsgnWrks Instagram Importer, according to its description, “will allow you to import and backup your Instagram photos to your WordPress site. Includes robust options to allow you to control the imported posts formatting including built-in support for WordPress custom post-types, custom taxonomies, post-formats.” This plugin also imports Instagram video. When you first launch DsgnWrks Instagram Importer, you can set up the import to filter by hashtags or by date. There are a number of custom tags you can use to control the title and content of imported images.

Instagram Picture provides a way to add Instagram images to almost any position in your blog. You can use shortcodes, widgets, and PHP to insert images with this plugin. Here’s a screenshot from the developer of one of the widget styles you can choose with Instagram Picture. This plugin also has a feature for adding individual image to posts.

Instagram Picture plugin

Instagram Slider Widget will display a grid of thumbnails like you saw in the image above, but it also has the option to shows up to 20 images in a slider. You can set the number of images to include in the slider and set a time for how often the plugin goes to Instagram to look for new photos. Instagram Slider Widget has an option to insert the images into your WordPress Media Library, which gives you a backup of your Instagram photos.

Alpine PhotoTile for Instagram offers more options than the plugins mentioned above. It retrieves (but does not back up on WordPress) as many as 100 photos. According to the developer, “The photos can be linked to your Instagram page, a specific URL, or to a Lightbox slideshow. Also, the Shortcode Generator makes it easy to insert the widget into posts without learning any of the code. This lightweight but powerful widget takes advantage of WordPress’s built in JQuery scripts.” The lightbox feature on this plugin sets it apart from the others. Alpine PhotoTile for Instagram will insert photos in a page, a sidebar, or a post. Of all the plugins I’ve mentioned, it has the most and best reviews.

The WordPress plugin directory has many, many Instagram plugins; I’ve only scratched the surface with these four. The ones I’ve highlighted all have good reviews. I suggest you look at the number and quality of reviews when you consider any plugin. If you use a plugin yourself, it’s very helpful to the WordPress community (you) if you return to the plugin page and leave a review.

Keep in mind that a widget that doesn’t store your photos in WordPress, but instead reaches out to Instagram to retrieve photos, may experience delays in loading if the Internet is clogged up that day.

Many Instagram plugins allow you to display not only your own photos, but the photos of people you follow or photos with a particular hashtag. If you choose a plugin with that capability, check carefully for the copyright issues involved, and make sure the original creator of the image is linked to the photo. I can definitely see the value of a post with a slideshow based on a particular hashtag, say #blogher14. Enjoy sharing your Instagram photos on your WordPress blog!

GoDaddy Managed WordPress is built from the ground up for maximum performance, security and ease of use. Click here to experience the difference.

Form New Habits for Working with CSS in Dreamweaver CC

The way the CSS Designer in Dreamweaver CC creates selectors is different from the way you may be in the habit of working with previous version of Dreamweaver.

Good, Bad Habits

You now need to know more about creating an appropriate selector. Instead of relying on Dreamweaver to generate a good selector for you based on your selection in the Document window, you need to be ready to decide for yourself what the best selector should be. This is especially true if you are using the CSS that comes from using the Dreamweaver grid layouts. The suggested selectors with a grid layout are quite cumbersome.

If you know what selector you want, Dreamweaver will help you choose it, but you have to know the trick.

A Specific Example

This example comes from a grid system layout. Other layouts might not have such ungainly selectors as default suggestions. If you click the familiar plus sign (+) to create a new selector while something is selected in the Document window, the selector suggested by Dreamweaver gives the full page structure.

The Dreamweaver suggested selector based on something selected in the Document window.

There is no longer a “Less Specific” option to remove the unneeded parts of this very long suggested selector. The easiest way to deal with it is to remove the entire thing. Do that by typing the beginning letters of what you know you want the new selector to be.

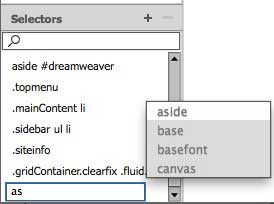
For example, if the element to style is an <a> element nested in an <aside> element, begin by typing as in the editable selector field. Code hint appear giving choices that contain “as.”

Begin typing a selector and Dreamweaver will show you options as code hints

Using the arrow keys, or the mouse, select aside. To add a descendent selector after aside appears in the editable selector field, type a space and another selector after aside. For this example, type a: and Dreamweaver shows code hints.

The field remains editable so that descendant selectors can be built

From the code hints for :. pick one of them using the mouse or arrow keys. Press Return/Enter when you’ve finally go the selector you want. The selector will turn blue and the Properties Pane for that selector will be populated with all the Property options.

Knowing how to use the code hints provided in the editable selector field will help you get quickly to the selector you need for a particular style.

Help Knowbility with this Indigogo project

Knowbility is a superb organization offering accessibility training, accessibility conferences, and accessibility information to web designers and developers. Now they want to develop online accessibiity training modules and they need your help.

Please contribute to the Indigogo campaign for this worthy project.