Contrast Ratio: A New Color Contrast Tool

Here’s a very nice new tool for checking color contrast against WCAG 2.0 standards for accessibility. It was created by Lea Verou and is called Contrast Ratio.

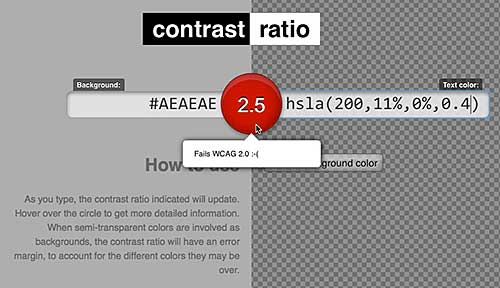
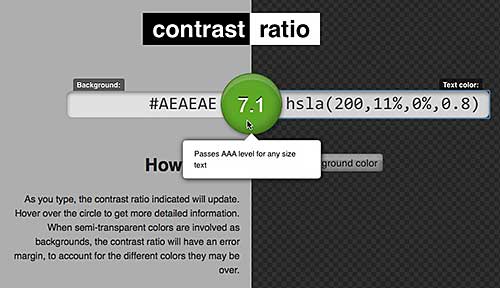
The tool allows you to swap text color and background color. It permits the use of transparency in both text color and background color. If your color choices fail to meet the WCAG 2.0 standards, the ratio button in the middle of the page turns red. Hovering over the button tells you how many, if any, of the WCAG 2.0 standards your colors meet.

Hover over the middle button to see how you're doing
Hover over the middle button to see how you’re doing

Bump up the level of opacity a bit on this color scheme and it passes.

A passing color ratio

Directions on the page explain some fancy ways to change the values for text and background colors. These are fun and time saving, but the real value in the tool comes from the clear and obvious way it reports on how the colors test out against WCAG 2.0 standards.

3 Ways to Add Instagram to a WordPress Blog

There are several choices open to you if you want to bring in your photos from Instagram into a WordPress blog: You can add a badge from Instagram, use embedding, or choose from a number of plugins.

How to Add Instagram to Your WordPress Blog

Place an Instagram Badge on Your Site

Sign in to your account on Instagram. There’s a “badges” option in the menu. A badge will put an icon on your site that links to your Instagram URL. It doesn’t bring in any images.

Instagram badges

Select a badge type and copy the code. I selected an icon, copied the code, and pasted it into Text view in a post. What showed up was a nifty little Instagram icon that linked to my feed on Instagram.com.

If I wanted this type of Instagram badge on my blog, I’d paste the code into a text widget in my sidebar, near my other social media badges and buttons. It doesn’t make much sense to put this icon in a post, because it will get buried over time.

Embed a Single Photo

You can put a single Instagram photo into a blog post using the Instagram “embed” option. Find the icon showing three dots next to the comment box and click it to see the embed option.

Embed a single Instagram photo

Instagram gives you the option to embed a single photo. Copy that code and paste it into the Text view of your post, and the photo will show up.

Instagram’s embed feature allows you to embed other people’s photos in your blog as well. The link to the original image on Instagram is included in the embed code, and shows up when you hover over the word “Instagram.”

Having this link included with the image skirts copyright problems by linking directly to the photo on the Instagram feed of the creator of the image.

WordPress Plugins

With a plugin, you get more than just an occasional image to insert into a post. There are plugins to create image sliders, to back up your Instagram photos to your WordPress database, or to place a small gallery of photos in your sidebar; others do even more. Most of the plugins below only require your Instagram username to work. The last one I mention gives you the option to set it up using the Instagram API.

DsgnWrks Instagram Importer, according to its description, “will allow you to import and backup your Instagram photos to your WordPress site. Includes robust options to allow you to control the imported posts formatting including built-in support for WordPress custom post-types, custom taxonomies, post-formats.” This plugin also imports Instagram video. When you first launch DsgnWrks Instagram Importer, you can set up the import to filter by hashtags or by date. There are a number of custom tags you can use to control the title and content of imported images.

Instagram Picture provides a way to add Instagram images to almost any position in your blog. You can use shortcodes, widgets, and PHP to insert images with this plugin. Here’s a screenshot from the developer of one of the widget styles you can choose with Instagram Picture. This plugin also has a feature for adding individual image to posts.

Instagram Picture plugin

Instagram Slider Widget will display a grid of thumbnails like you saw in the image above, but it also has the option to shows up to 20 images in a slider. You can set the number of images to include in the slider and set a time for how often the plugin goes to Instagram to look for new photos. Instagram Slider Widget has an option to insert the images into your WordPress Media Library, which gives you a backup of your Instagram photos.

Alpine PhotoTile for Instagram offers more options than the plugins mentioned above. It retrieves (but does not back up on WordPress) as many as 100 photos. According to the developer, “The photos can be linked to your Instagram page, a specific URL, or to a Lightbox slideshow. Also, the Shortcode Generator makes it easy to insert the widget into posts without learning any of the code. This lightweight but powerful widget takes advantage of WordPress’s built in JQuery scripts.” The lightbox feature on this plugin sets it apart from the others. Alpine PhotoTile for Instagram will insert photos in a page, a sidebar, or a post. Of all the plugins I’ve mentioned, it has the most and best reviews.

The WordPress plugin directory has many, many Instagram plugins; I’ve only scratched the surface with these four. The ones I’ve highlighted all have good reviews. I suggest you look at the number and quality of reviews when you consider any plugin. If you use a plugin yourself, it’s very helpful to the WordPress community (you) if you return to the plugin page and leave a review.

Keep in mind that a widget that doesn’t store your photos in WordPress, but instead reaches out to Instagram to retrieve photos, may experience delays in loading if the Internet is clogged up that day.

Many Instagram plugins allow you to display not only your own photos, but the photos of people you follow or photos with a particular hashtag. If you choose a plugin with that capability, check carefully for the copyright issues involved, and make sure the original creator of the image is linked to the photo. I can definitely see the value of a post with a slideshow based on a particular hashtag, say #blogher14. Enjoy sharing your Instagram photos on your WordPress blog!

GoDaddy Managed WordPress is built from the ground up for maximum performance, security and ease of use. Click here to experience the difference.

Form New Habits for Working with CSS in Dreamweaver CC

The way the CSS Designer in Dreamweaver CC creates selectors is different from the way you may be in the habit of working with previous version of Dreamweaver.

Good, Bad Habits

You now need to know more about creating an appropriate selector. Instead of relying on Dreamweaver to generate a good selector for you based on your selection in the Document window, you need to be ready to decide for yourself what the best selector should be. This is especially true if you are using the CSS that comes from using the Dreamweaver grid layouts. The suggested selectors with a grid layout are quite cumbersome.

If you know what selector you want, Dreamweaver will help you choose it, but you have to know the trick.

A Specific Example

This example comes from a grid system layout. Other layouts might not have such ungainly selectors as default suggestions. If you click the familiar plus sign (+) to create a new selector while something is selected in the Document window, the selector suggested by Dreamweaver gives the full page structure.

The Dreamweaver suggested selector based on something selected in the Document window.

There is no longer a “Less Specific” option to remove the unneeded parts of this very long suggested selector. The easiest way to deal with it is to remove the entire thing. Do that by typing the beginning letters of what you know you want the new selector to be.

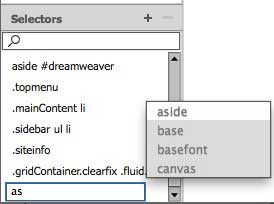
For example, if the element to style is an <a> element nested in an <aside> element, begin by typing as in the editable selector field. Code hint appear giving choices that contain “as.”

Begin typing a selector and Dreamweaver will show you options as code hints

Using the arrow keys, or the mouse, select aside. To add a descendent selector after aside appears in the editable selector field, type a space and another selector after aside. For this example, type a: and Dreamweaver shows code hints.

The field remains editable so that descendant selectors can be built

From the code hints for :. pick one of them using the mouse or arrow keys. Press Return/Enter when you’ve finally go the selector you want. The selector will turn blue and the Properties Pane for that selector will be populated with all the Property options.

Knowing how to use the code hints provided in the editable selector field will help you get quickly to the selector you need for a particular style.

How (and When and Why) to Set Up a Child Theme in WordPress

If you aren’t quite up to creating your own WordPress theme from scratch, but you know some CSS, you can still customize a WordPress theme. The secret is using a child theme.

How

Besides knowing a bit of CSS to customize your theme, you also need to know how to create a folder and add a file to it on your server. You can do this with FTP, or you can sign in to your server and use the control panel to do it.

Pick a Theme

What kind of theme do you want? You might be looking for a responsive design that will work on any device, you might want a certain number of columns or a certain layout. It’s often easy to find something that’s almost what you want. Maybe you don’t like the colors or want different fonts, but it comes close to what you want. That kind of theme is a perfect candidate to customize with a child theme.

Get your almost-perfect theme installed in WordPress and make it the active theme. Now you’re ready to start working on the child theme.

Create up the Child Theme Folder

For the examples, I’m going to assume you picked the WordPress theme twentyeleven. Everything I say about twentyeleven should be changed to reflect the name of the theme you actually use instead.

In your themes directory, create a new folder. If the theme you’re using is twentyeleven, the folder for the child theme would be twentyeleven-child. That’s the theme name, a hyphen, and the word child. Here’s an example of how it might look.

a child theme folder in the directory structure

Add the new Style Rules

The only file that has to be placed in the new child theme folder is a style.css file. Any changes you make to the CSS for the theme will be saved in the style.css file in the child theme folder and will overrule the CSS in the parent theme once you’ve set it all up.

The style.css document you put in the child theme folder must start with specific information. Of course, you change it to match your particular names.


/*
 Theme Name:   Twenty Eleven Child
 Description:  Twenty Eleven Child Theme
 Author:       Jane Doe
 Author URI:   http://example.com
 Template:     twentyeleven
*/

@import url("../twentyeleven/style.css");

/* =Theme customization starts here------------ */

You don’t have to have all that. The only required lines are the Theme Name, the Template, and the ‘@import url’ line. The @import line brings in all the style rules from the parent theme.

Under the line where it says “Theme customization starts here,” put any new style rules you need. The rules you’ll need are things you want to be different from the way they are in the parent theme.

Activate Your Child Theme

Even before you add any CSS rules to the child theme stylesheet, you can activate the theme. Log in to your WordPress site’s dashboard. Go to Administration Panels > Appearance > Themes. You will see your child theme listed there. Click Activate.

When you look at your blog in the browser, it will look exactly like the parent theme, but as you add new rules to the child theme style.css file, you will see your customizations taking shape.

Find the Selectors and Write New Styles

If you see something you want to customize, you need to look for it in the style.css file for the parent theme. Once you’ve found the rule in the parent stylesheet, you know what selectors to use to make changes in the child stylesheet.

For example, on one of my blogs, I didn’t like the way the h3 headings in the parent theme looked. I found the rule for the the h3 headings. In my parent theme, it looked like this:


.entry-content h3,
.comment-content h3 {
	font-size: 10px;
	letter-spacing: 0.1em;
	line-height: 2.6em;
	text-transform: uppercase;
}

I didn’t like the size, or the line height, and I didn’t like the uppercase. To overrule that, I used the same selectors, but I put a new rule for those selectors in the style.css file in the child theme folder.


.entry-content h3,
.comment-content h3 {
	font-size: 16px;
	font-weight:bold;
	line-height: 1.6em;
	text-transform: none;
}

I got bigger, bolder, headings that weren’t all uppercase! Just what I wanted.

More Advanced Customizations

Other parts of your theme can be customized as well. You might want to add something to the header.php file or the functions.php file. This can be done by adding the changed files to the child theme folder. If the parent theme is updated, none of your changes in the child theme folder will be lost. The WordPress Codex has more information to help you to move to the advanced level.

Note that a child theme can only be used when a blog has WordPress installed on its own domain. Child themes won’t work for themes hosted on wordpress.com.

GoDaddy Managed WordPress is built from the ground up for maximum performance, security and ease of use. Click here to experience the difference.
10 Awesome Free Photoshop Extensions

10 Awesome Free Photoshop Extensions

Photoshop is one of the most amazing pieces of design software ever created, and I, for one, absolutely applaud Adobe for adopting the software-as-a-service business model, which makes Photoshop and the rest of the Creative Suite more accessible to graphic designers everywhere. Another key component of Photoshop is the ability to extend it with third-party plugins. If you want to take Photoshop to the next level, download the following 10 awesome free Photoshop extensions today.

Skeumorphism.it

The days of high-gloss and texture are over – flat is in! With this Photoshop plugin, you can make your design flat in, well, no time flat!

Flat Icon

The Flat Icon plugin lets you instantly access more than 25,000 icons to use in your designs, right from Photoshop’s interface.

CSS3Ps

Crafting a compelling design in Photoshop is one thing, but turning it into workable CSS styles for websites is another. This handy Photoshop plugin automatically converts your layer styles into CSS.

BlendMe.in

Access thousands of vectors to use in your designs fast and easy right from Photoshop’s interface with this awesome plugin.

Interface Tools

The ultimate interface toolkit for Photoshop, Interface Tools eliminates the need to endlessly search for Photoshop tools and provides a host of other functions that streamline the design process, all free of charge.

GuideGuide

Grid-based layouts are the most attractive, but Photoshop makes it painfully difficult to work with grids. With GuideGuide, you’ll have properly proportioned grids in seconds.

Layer Guides

If you add guides to your layers, you know how tedious it can be to click, click, click for every single layer. Layer Guides adds guides to all of your layers with a single click.

Divine Project

PSD to WordPress designers take note: This is the ultimate extension for you, because it helps quickly convert Photoshop designs into workable WordPress themes. Zero coding required!

Web Font Plugin

Access Google and WebINK web fonts from Photoshop’s interface with this ultra-useful plugin.

CutandSlice.me

For all its advances, Photoshop is still old school when it comes to slicing graphics for the web. The Cut&Slice Me plugin makes it easy to quickly slice graphics for today’s web, including the capability to slice and capture all button states at once.

What’s your favorite free Photoshop plugin?

Author’s Bio: Brian Morris writes for the PsPrint Design & Printing Blog. PsPrint is an online commercial printing company. Follow PsPrint on Twitter @PsPrint.

10 New Photoshop Freebies

One of the greatest things about the field of graphic design is that so many talented professionals are willing to share their work with one another. This is especially true for Photoshop, arguably the most popular graphic design software on the planet. Photoshop freebies make it easy to improve your efficiency and productivity as a designer, thereby helping you make more money in less time. Here are 10 new Photoshop freebies you should add to your stable today.

1. Flaticon.com Photoshop Plugin

I think you’ll come to regard this as one of the best Photoshop plugins you ever install. The Flaticon.com Photoshop plugin gives you access to more than 14,000 free icons, searchable from right within Photoshop!

Flaticon

2. Retinize It

Retinize It is a Photoshop plugin that slices your designs to make them Retina-ready. Take advantage of the most advanced screen display technology by ensuring your websites and iOS apps are Retina-ready with this free plugin.

retinize

3. Camouflage Patterns for Photoshop

Go full camo with this set of 10 free camouflage patterns for Photoshop, created by user Tijo and posted on Brusheezy.

camo

4. Vanilla Cream UI Kit PSD

One of the most aesthetically pleasing UI kits on the web is available as a free PSD download! This UI kit includes elements for blogs, forms, filters, buttons and more.

vanilla

5. Color Swap and Monochrome Photoshop Actions

Michelle Kane continues to offer outstanding, premium-quality Photoshop freebies on her website. The color swap action lets you instantly and effortlessly change background colors, while the monochrome action gives your grayscales a professional finish.  Other Photoshop freebies are also available

michelle kane

6. Instagram Vintage Pro Photoshop Action

Give your images the vintage look Instagram users love with this action by DeviantArt user Friabrisa.

vintage pro

7. HDR Photoshop Action

This Photoshop freebie is a sample from the commercial Faux HDR Actions suite, and will give your photos a premium HDR photography appeal out-of-the-box.

free HDR

8. Fall Foliage Photoshop Brushes

From the Creature Comforts blog comes this set of 23 high-quality fall foliage Photoshop brushes that look absolutely beautiful when finished with a watercolor effect.

fall brushes

9. Photoshop Skin Smoothing Action

Fundy presents this free Photoshop skin smoothing action, available for instant download from their website. Soften your portrait subjects for beautiful glamor shots and more.

skin smoother

10. High-resolution Photoshop Watercolor Brushes

Digitally paint watercolor masterpieces with this set of 38 free watercolor brushes by Brusheezy contributor Sandy.

watercolor brushes

Guest Author Brian Morris writes for the PsPrint Design & Printing Blog. PsPrint is an online commercial printing company. Follow PsPrint on Twitter @PsPrint.