Useful links: gut instincts, information hierarchy, education costs

Trusting your gut instincts is an interview at .net with Steph Troeth. Learn something about this important leader and find out what a user experience strategist is.

A Hierarchy of Information Needs is from Content Strategy >n00b< and is a worthy read.

TechCrunch weighs in on Why Obama’s Radical Education Plan Could Finally Disrupt College. They make some interesting points, but the article is in the realm of speculation, not fact. What did you think of his education speech the other day?

Top 10 Online Graphic Design Courses

You can teach a classically-trained graphic designer new tricks

While the graphic design community debates whether it is necessary to obtain a graphic design degree or whether self-taught graphic designers can craft quality designs on par with those of degree-holding designers, you can quietly bolster your graphic design skills and become a better – and more marketable – graphic designer by taking the following 10 free and low-investment online graphic design courses.

Teach Yourself Graphic Design

This PSD Tuts Plus self-study online course teaches the basics of graphic design. Following a standardized curriculum, you’ll learn graphic design theory and the best practices you need to build a strong foundation in design.

Graphic Design Theory?

Published on design authority AIGA’s website, Helen Armstrong’s outstanding article lends perspective into graphic design theory. Once you’ve learned the basics in the PSD Tuts Plus course, you’ll benefit from this alternative viewpoint that delves into what graphic design theory really means, as well as its impact on how you work as a graphic designer.

Digital Typography

If you want to establish yourself as a stellar graphic designer, don’t skimp on learning typography. Your choice of typography can make or break any design, no matter how good or bad it already is. This free course, complete with materials, was developed by MIT and published on About.com.

How to Design a Logo

What goes into a great logo design? Find out the answer to that question as you explore great logo artwork so you can craft your own unique logos and outstanding brand images. This course is $45; an investment that pales in comparison to a single credit hour.

Photoshop Basix

Part of the PSD Tuts Plus “Sessions” series, this course reveals the secrets to mastering Photoshop. The result? You’ll be a more talented designer capable of quick, accurate work; thus, far more marketable.

Logo Design: Let The Type Do The Talking

This $20 Skillshare course explores the role typography plays in logo design, and how you can select the right logo typography to influence emotion.

The Graphic Design School

This complete course curriculum covers nearly every aspect of graphic and web design. Find myriad classes and certificates to achieve, and be instructed by knowledgeable instructors. The fees are higher than other options listed here – around $2,000 – but still far cheaper and quicker than earning an MFA.

Illustrator Training Course

Vector Diary’s four-week Adobe Illustrator course is the perfect way to quickly learn and master the nuances of one of the most popular vector design programs in the world.

HOW Design University

The experts at HOW Design have created a comprehensive graphic design learning program that covers far more than the basics of design. From advanced typography to design business management, you can take online courses designed to make you a more successful designer for around $200 each.

The Complete Guide to Starting a Graphic and Web Design Business From Home

Colorburned’s Gino Orlandi takes you step-by-step through the process of starting a successful design business from home. This course represents an excellent overview of the world of self-employed graphic designers and helps you make important decisions up-front, such as determining what your niche will be so you can market to targeted customers.

What self-study online graphic design courses do you recommend?

Guest Author Brian Morris writes for the PsPrint Design & Printing Blog. PsPrint is an online commercial printing company. Follow PsPrint on Twitter @PsPrint and Facebook.

Useful links: web education, srcset, design errors

Is Web Design Education Under Appreciated and Dying on the Vine? An important discussion started by Bill Cullifer at WebProfessionals.org.

Improved support for high-resolution displays with the srcset image attribute explains Webkits support for srcset.

5 Signs You’re Falling Short in You Web Redesign Project. What to lookout for.

Creating Transitions in Dreamweaver CC

The CSS interface for Dreamweaver CC is very different from the classic look seasoned users interacted with for years. In Dreamweaver 6, CSS 3 transitions were added to Dreamweaver’s design tools. The interface works approximately the same in Creative Cloud (Dreamweaver CC).

I added a transition to a couple of images on my home page. Here’s how I did it, step-by-step.

1. Find or create a selector

I decided to apply the transition to a couple of book images. I added class="grow" to the images, so I could target them easily for the transition.

Also note, while you’re looking at the code for the image, that it is set at a width of 30%. My goal is to change that width with my transition rule.

class selectro

2. Add a new Transition and Target a Rule

In the CSS Transitions panel, I clicked the familiar plus sign to add a new transition. A dialog window opened. I’ll go through it in steps.

target rule

First, pick the target rule. Every rule you have in your style sheet is shown in alphabetical order. Like any other field in Dreamweaver, you can type directly in the field if you want instead of looking through your list of styles. I selected the .grow rule to target.

3. Transition On

The next choice is to decide when you want the transition to happen. You can see the options in the image. I picked on hover.

hover

4. Pick the timing

You can use the same transition for all properties, as I have here. You can also set different transitions for different properties if you want to have more than one transition happening in the same event.

You set the duration and delay in either seconds or milliseconds. The timing function offers ease-in, ease-out and others as well as the one I picked, linear.

duration and timing

5. Pick a property to transition

Click the plus in the Property area. As I mentioned, my goal is to change the width of the image during the transition, so I picked the property width. I set the end value to 40%.

Finally, I picked the stylesheet where I wanted it saved, and clicked Save Transition.

width

And You’re Done

That’s the transition. It’s now shown in my CSS Transitions pane. I can edit it at any time by double clicking the transition.

transitions list

This was added to my stylesheet. The necessary vendor prefixes are included.

css rule

In a browser, you see the normal display to the left, and what happens on hover to the right in this composite image.

results

You’re now ready to make transitions happen in Dreamweaver Creative Cloud.

See Also: Dreamweaver and CSS in Creative Cloud

Dreamweaver and CSS in Creative Cloud

The Dreamweaver wizard that Macromedia came up with way back in the dark ages to create CSS rules stayed with us and served us well for a long time. Because of all the CSS 3 properties that have come along since then that weren’t anywhere in the wizard, things were due for a change.

In Dreamweaver CC, we see the change. It looks really different, but you’ll get the hang of it quickly.

Choose Your View: Compact or Expanded

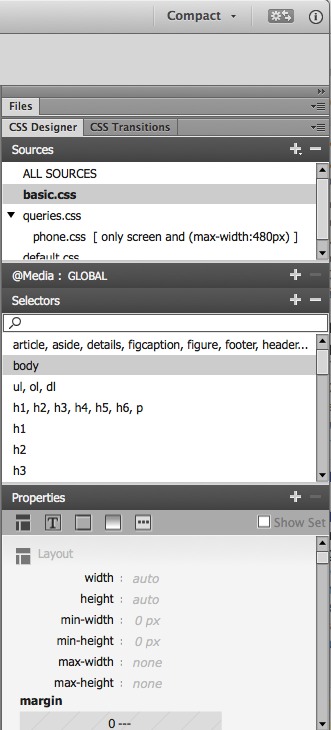
The panels are where the action is now, not in a pop-up dialog box (the well-known wizard). You can view the CSS tools with the panels in either compact or expanded view. Here’s compact.

DW CSS panels

Start from the very top menu bar, you see the pull down menu to choose compact or expanded.

In the panels area, you see I’ve collapsed the Files panel. Immediately under that you see two CSS main panels, CSS Designer and CSS Transitions. With the CSS Designer panel active, under it you see the list of style sheets in my particular example. There’s a panel for adding @media queries (collapsed in this image) to your stylesheets, just in case you didn’t start your project by creating layouts for various media sizes from the outset. There’s a Selectors panel which looks quite familiar, and a Properties panel which is very changed. We’ll look at the fine details about the Properties panel in just a bit.

First lets see the expanded view.

DW expanded view

In the expanded view, you have space to see a smidgen of the Files panel and a whole lot more of the crucial Properties panel. You can see that this particular example has a style sheet called basic.css selected, and within that a rule for body is highlighted.

It only takes a second to switch from Compact to Expanded view, but you’ll find it almost impossible to do anything useful to your CSS in Compact view, so that’s a good thing.

The Properties panel

At the top of the Properties panel, you see icons for the categories of CSS you will want to work with. The first category is layout. I’ve pasted two sections of this together into one long image, so you get an idea of what you would see if you scrolled down a bit in the layout category.

layout

You have a box model thumbnail for setting margins, padding, and positioning. Below that you set float, clear and more. You can set individual properties for margins and padding by typing any amount and unit you want, or you click the linky looking symbol in the center to set them all at once.

If you continue to scroll down, you come to the Text category, or you can click the Text icon at the top.

text

Below what you see here for text, you also have a text-transform, letter spacing, alignment  and other text choices.

border

Border is the next category. Scroll below what you see here and there’s a border-radius area with a nice thumbnail representation of your choices for each corner.

background

Background is the next category. The box-shadow options will show in the next image.

other

The last category is Others, which includes list options.

On the right of the Properties panel title bar, you see a box called “Show Set.” If you select that, you see only the properties that have been assigned a value.

Nothing looks the same, but it only takes a second to grasp what the new symbols represent.

float and clear

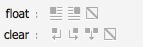
Look at the icons for float and clear, for example. You click the icons to set up float:left, float:right or float:none. With clear, you click the icons for clear:left, clear:right, clear:both, or clear:none. It’s different looking, but what you’re doing is pretty obvious once you figure out how the interface is organized now.

After you’ve worked on your CSS, change the view back to Compact while you’re working in the Document window so you have more space on your screen.

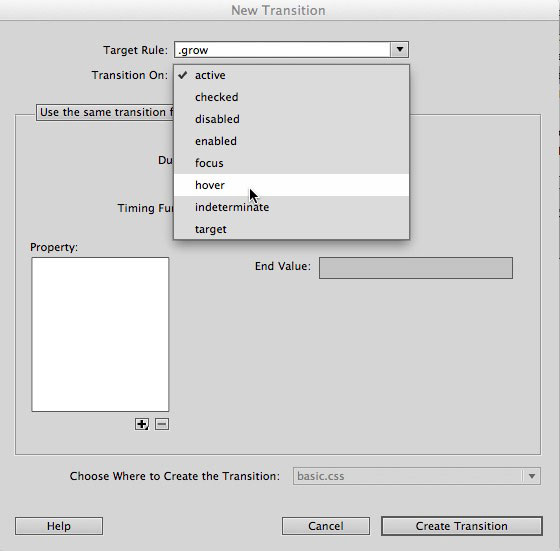
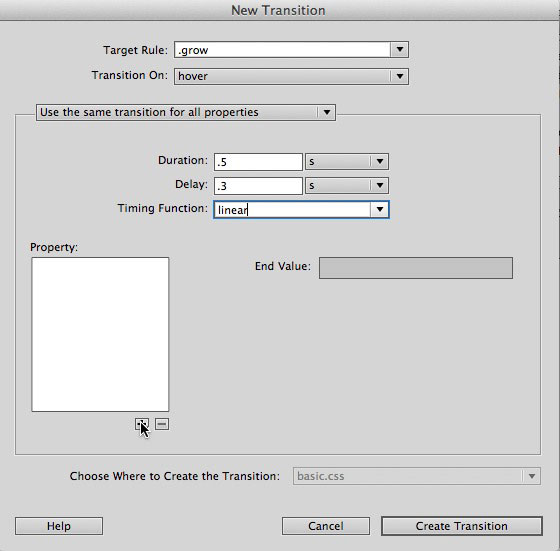
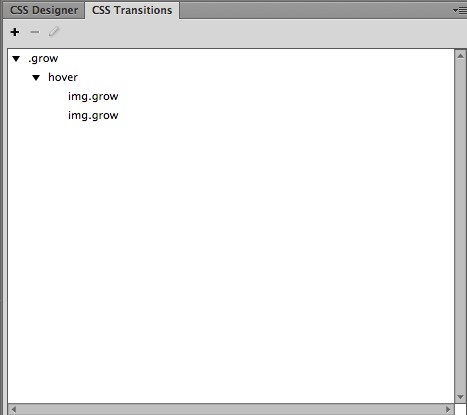
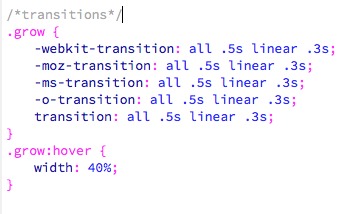
See Also: Creating Transitions in Dreamweaver CC.

Congratulations to Happy Cog

With It’s About Damn Time, the design firm Happy Cog posted this announcement by company President Greg Storey.

In a few days, our newest designer will begin her first day. When Dana crosses the threshold, the Happy Cog payroll will be 50% female. Roughly four years ago, that percentage was at a measly 2%. By next Monday, we will have women well-represented within our design, development, project management, and marketing groups—two of them dominantly female: project management with a whopping 80% and design with a stellar 63%.

Happy Cog, founder Jeffrey Zeldman, and everyone involved in making this a reality deserve recognition and congratulations for not just talking the talk, but for walking the walk. They are a premier firm in the web design industry and their leadership means something.

We’ve seen Zeldman put belief into practice at An Event Apart conferences where there are frequent female speakers. Now we’re seeing it in his design business as well.

It’s good for business. It’s good for everyone. I’m really happy about Happy Cog.

Useful links: new iPhones coming, letterforms, privacy in email

The new iPhone release is set for September 10. Related to that, I recently got a PR pitch from uSell.com. Since I no longer work for BlogHer – the people pitching are hoping for exposure on BlogHer –  I normally delete most PR pitches without even opening the email. This one caught my eye because it had iPhone in the subject line. The email talked about selling your old iPhone on uSell.com, and said, “iPhone sellers can earn an extra $72 by taking action before Sept. 10.” I want to quote some info supposedly based on research by uSell.

To measure the effect of a new iPhone model on the used iPhone market, uSell.com examined hundreds of used iPhone sales on its platform following the 2012 iPhone 5 launch.  Notable findings include:

*  1 week after a new iPhone launch, old iPhones lose about 5% in value.
*  2 weeks after launch, old iPhones depreciate about 12%.
*  By weeks 3 and 4, old phones are worth about 20% less.

But by locking in a sale price BEFORE an upcoming iPhone launch (many platforms like uSell.com offer 30-day price guarantees), consumers can substantially increase the value of their old phones:

*  iPhone 5:  Potentially worth $72 more (compared to 3 weeks after launch)
*  iPhone 4S:  Worth $46 more
*  iPhone 4:  Worth $29 more


I upgraded my phone not too long ago at AT&T and received $118 in credit for my old iPhone 4. I’m not sure uSell can beat a price like that, but I thought you might be interested in checking it out if you plan to upgrade immediately on Sept. 10.

Must reading is this beautiful post by Dan Mall about letterforms.

No, Google did not say that there is no privacy in Gmail. TheNextWeb looks at the statement from yesterday in context.