How to Use the WAVE tool to Test and Boost Site Accessibility

Did you hear? A website should be accessible to everyone who comes to visit. Yeah, I’m sure you’ve heard that. But how do you know if you have an accessible site? There are all sorts of rules and checks involved in accessibility, but if you’re working with a WordPress blogger who just wants to do the best with limited knowledge, there’s one tool that can be a big help. It’s the WAVE tool from WebAIM.

How to use the WAVE tool to test and boost site accessibility

The WAVE tool tests accessibility. Many other tools do the same thing, but this one is particularly user friendly and helpful.

Start by entering your URL in the opening screen.

The WAVE tool URL entry form

The tool churns away for a while, and finally posts a shot of your blog with icons all over it. Each icon tells a story about some accessibility feature of your blog.
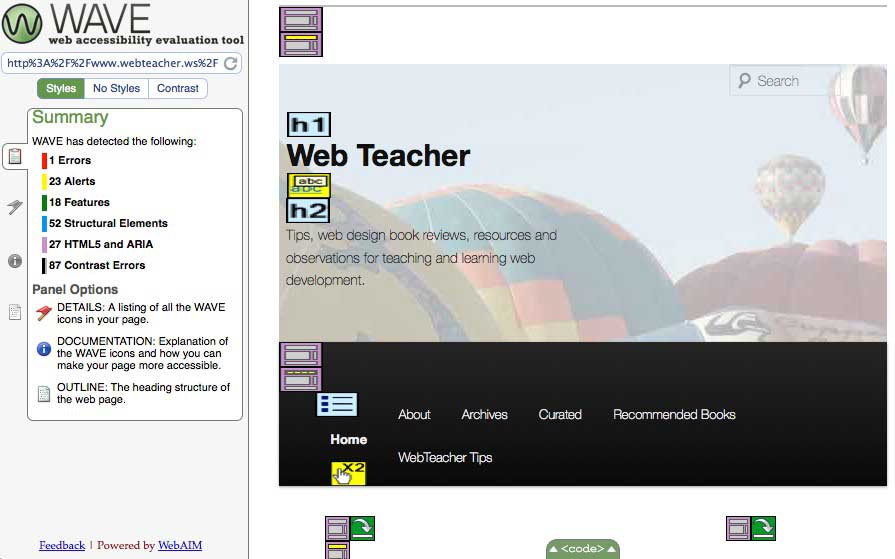
The WAVE tool results show icons on various parts of your blog

The default results page shows you a summary in the sidebar. It lists errors (red icons), alerts (yellow icons), features (green icons), structural elements (blue icons), HTML5 and ARIA elements (lavender icons), and contrast errors (which don’t show up as icons). Above the summary results are buttons to let you look at the page with no styles, or to view only the contrast errors. To the left of the summary panel, you can opt to see details, documentation, or an outline of the page structure.

Click on any WAVE tool icon for more information

On the right, where your web site is pictured, you can click on any icon to get a brief explanation and a link to more information. In this image, the yellow alert icon is telling me that the link in the date goes to the same place as the link in the H1 heading just before it. This isn’t great, but it also is something about WordPress that I cannot change easily. I’ll get into what you can and cannot fix easily in just a bit.

You can look at the code for the items the icons mention if you click the “code” tab at the bottom.

The code panel shows you the code related to any icon you click on the page of WAVE tool results

When you click the “code” panel, you go right to the code for any icon you click.

Fixes: Dealing with Content

The easy fixes for WAVE tool errors and alerts all deal with the content of your page. This is the stuff you control when you enter a new post.

  • WAVE looks for alt text on images. The WordPress image uploader always wants to add title text—you don’t need that. You do need alt text that describes what your image is and how it functions as part of your content.
  • The WAVE tool checks for structural elements like headings and lists. Headings are important in terms of organization, structure, and information hierarchy. These should be real headings made from tags that begin with “h,” like h1 or h2 or h3, and not some words that you’ve made bold. Headings also help with navigation for users on assistive devices like screen readers.

If you don’t have these two features on your page, you need to change your habits as you write your content. Add the alt text as you embed images, and make headings using the formatting tools in the tool bar as you write your post.

Fixes: Dealing with CSS

You may have errors that relate not to how you enter content, but to the CSS for your blog. Perhaps your color scheme lacks enough contrast for certain users. In How (and When and Why) to Set Up a Child Theme in WordPress, I explained how to change the CSS in your blog with a child theme. If you need to increase color contrast or make other changes involving styles, a child theme is the way to do it.

Fixes: Dealing with Code

Some errors and alerts come out of the code that comes from WordPress. Sometimes errors like these are easy to fix; sometimes they are not. I pointed out a case above where duplicate links were shown in an alert. That’s just going to be that way on my blog.
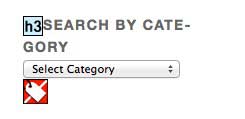
The WAVE tools error for a lack of label on a form field.

There’s an error on my blog because the select menu for my categories doesn’t have a label. The category menu is a widget. There’s no way to get into the code for this widget. Knowing about the error made me do the best I can with the heading right before the select menu. I hope the heading helps, but this error is just going to stay an error.

The WAVE tool looks for ARIA landmark roles

The WAVE tool looks for ARIA landmark roles. If your theme is missing them—that’s a code problem that’s easy to fix. The fix uses a child theme. In Think about ARIA roles when choosing a WordPress theme, I explain how to insert ARIA landmark roles in your code. It’s easier than it sounds.

Getting started with accessibility can be daunting because there are so many details involved, but the WAVE tool can guide you on your way. Run your blog through it. Fix any errors and alerts you can fix. If you absolutely cannot fix something, so be it. But if you can correct an error with a simple change of habit—or by implementing a few easy changes —it will make a huge difference to your users.

Go back to the WAVE tool every once in a while, and retest yourself to make sure you’re still on track.

GoDaddy Managed WordPress is built from the ground up for maximum performance, security and ease of use. Click here to experience the difference.
Sections and Articles are Not Generic Containers

html5 logo

The proper use of section and article elements in HTML5 is one of the sticking points to good implementation. If you’re teaching HTML5, or just learning about HTML5, here’s a tip for you.

A section element (or an article element) should not be used as a container for styling purposes. However, any time you have some content that needs a heading or h1, h2, etc. at the beginning, sections and articles are semantic candidates for proper markup.

If what you are doing is wrapping something up in a container with an id or class that will be used for anything but content with a heading at the top, you should use a div. A div is, by definition, a generic container. It carries no semantic meaning. It needs no heading element. It is meant to hold blocks of the page for styling purposes.

The W3C offers this guidance:

Each section should be identified, typically by including a heading (h1-h6 element)as a child of the section element.


Each article should be identified, typically by including a heading (h1-h6 element) as a child of the article element.

Improve Your SEO with the WordPress SEO by Yoast Plugin

WordPress SEO by Yoast is one of the most useful WordPress plugins available. It’s been downloaded by millions of WordPress users. At the WordPress plugin review page, there are almost 1000 reviews, with a rating of 4.7 out of 5 stars. If you are like me and always check reviews before you download a plugin, you will agree that those are some impressive stats.

Improve Your SEO with the WordPress SEO by Yoast Plugin

WordPress SEO by Yoast does several things that make it so helpful.

  • It analyzes your post based on a focus keyword of your choice. It checks on your use of the focus keyword in the title, headings, and text.
  • It looks at your title and lets you write a meta description of the post that appears on sites where you might promote your post such as Google+.
  • It comes with Twitter card implementation, which means when you post to Twitter a description of the post appears in the tweet.
  • It gives your post a rating of good, okay, or bad and teaches you how to improve your score if it isn’t as good as you want.

Let’s look at how it does the things I mentioned in more detail.

WordPress SEO by Yoast Analyzes Your Post with a Focus on Your Keywords

When the plugin is installed, a panel appears directly under your post. This is where you enter focus keywords and meta descriptions as well as learn how to improve your post and create meta descriptions targeted for particular social media if desired.

Improve Your SEO with the WordPress SEO by Yoast Plugin

The snippet preview shows you how the post will look to the search engines. You enter the focus keyword and the meta description. As you enter the meta description, it tracks your characters and tells you how many are left. Save the draft of your post to see how SEO Yoast graded what you’ve done.

Your rating appears in the Publish panel.

Improve Your SEO with the WordPress SEO by Yoast Plugin

The green disc next to SEO in the publish panel indicates that I’m doing pretty well with things. Yellow indicates okay and red is bad. If you click the “Check” link next to the colored disc, you are returned to the WordPress SEO by Yoast control panel, where the second tab gives you Page Analysis. You see the same info by selecting the Page Analysis tab.

Improve Your SEO with the WordPress SEO by Yoast Plugin

By looking at the page analysis, I can see what I need to change. I changed one of my H2 headings after checking this. I appreciate getting the reading level analyzed, because I tend to write long convoluted sentences, rather like this one, that decrease readability.

Customize the Meta Description for Different Sites

If you select the Social tab in the control panel, you can customize the meta description for specific sites.

Improve Your SEO with the WordPress SEO by Yoast Plugin

Twitter Card Implementation with WordPress SEO by Yoast

Using Twitter cards makes a big difference in how your tweets display. The heading, the description, and a photo all show up on Twitter if you use a Twitter card. Here’s an example of how a tweet with a Twitter card looks:

Improve Your SEO with the WordPress SEO by Yoast Plugin

With the plugin installed, an SEO category appears in your WordPress Dashboard menu sidebar. Clicking anything in this menu takes you to the Yoast WordPress SEO dashboard, so I always make sure I’ve saved my draft before I use this menu.

Improve Your SEO with the WordPress SEO by Yoast Plugin

Select Social and then select the tab for Twitter.

Improve Your SEO with the WordPress SEO by Yoast Plugin

Select the Twitter card meta data checkbox and supply your Twitter Username. Save. Follow the link to the Twitter Card Validator, where you’ll pick a card type, grab some embed code to add to the document HEAD of your page, and apply for Twitter card approval.

A Few Final Options

The screen shots above show a number of options and settings I didn’t have the space to get into in this post. On the Advanced tab, there are options for redirects, Canonical URLs and more. Options in the sidebar SEO category will take you to the Yoast WordPress SEO dashboard where you can set up your site with Google and Bing webmaster tools, make choices about titles and meta settings, enable an XML sitemap, make choices about permalinks, internal links, breadcrumb settings, RSS feeds, import settings from other plugins, and edit your robots.txt and .htaccess files.

I’m not a heavy user of plugins, but this one provides a lot of benefits. I think you’ll find it helpful. You can download the plugin from the developer’s site at yoast.com or from the WordPress plugin directory.

GoDaddy Managed WordPress is built from the ground up for maximum performance, security and ease of use. Click here to experience the difference.

Good Accessibility Talk to Watch (Video)

This is worth your time. It’s a talk by Monika Piotrowicz of Shopify. I like her instruction to use basic HTML whenever possible instead of putting something else in to overrule the semantics. Her explanation of ARIA is excellent.

The close captions aren’t great. They were generated automatically rather than from a transcript, but they do appear if you need them.

Hat tip to Dennis Lembree who shared this on Google+, which is where I first saw it.

How (and When and Why) to Set Up a Child Theme in WordPress

If you aren’t quite up to creating your own WordPress theme from scratch, but you know some CSS, you can still customize a WordPress theme. The secret is using a child theme.

How

Besides knowing a bit of CSS to customize your theme, you also need to know how to create a folder and add a file to it on your server. You can do this with FTP, or you can sign in to your server and use the control panel to do it.

Pick a Theme

What kind of theme do you want? You might be looking for a responsive design that will work on any device, you might want a certain number of columns or a certain layout. It’s often easy to find something that’s almost what you want. Maybe you don’t like the colors or want different fonts, but it comes close to what you want. That kind of theme is a perfect candidate to customize with a child theme.

Get your almost-perfect theme installed in WordPress and make it the active theme. Now you’re ready to start working on the child theme.

Create up the Child Theme Folder

For the examples, I’m going to assume you picked the WordPress theme twentyeleven. Everything I say about twentyeleven should be changed to reflect the name of the theme you actually use instead.

In your themes directory, create a new folder. If the theme you’re using is twentyeleven, the folder for the child theme would be twentyeleven-child. That’s the theme name, a hyphen, and the word child. Here’s an example of how it might look.

a child theme folder in the directory structure

Add the new Style Rules

The only file that has to be placed in the new child theme folder is a style.css file. Any changes you make to the CSS for the theme will be saved in the style.css file in the child theme folder and will overrule the CSS in the parent theme once you’ve set it all up.

The style.css document you put in the child theme folder must start with specific information. Of course, you change it to match your particular names.


/*
 Theme Name:   Twenty Eleven Child
 Description:  Twenty Eleven Child Theme
 Author:       Jane Doe
 Author URI:   http://example.com
 Template:     twentyeleven
*/

@import url("../twentyeleven/style.css");

/* =Theme customization starts here------------ */

You don’t have to have all that. The only required lines are the Theme Name, the Template, and the ‘@import url’ line. The @import line brings in all the style rules from the parent theme.

Under the line where it says “Theme customization starts here,” put any new style rules you need. The rules you’ll need are things you want to be different from the way they are in the parent theme.

Activate Your Child Theme

Even before you add any CSS rules to the child theme stylesheet, you can activate the theme. Log in to your WordPress site’s dashboard. Go to Administration Panels > Appearance > Themes. You will see your child theme listed there. Click Activate.

When you look at your blog in the browser, it will look exactly like the parent theme, but as you add new rules to the child theme style.css file, you will see your customizations taking shape.

Find the Selectors and Write New Styles

If you see something you want to customize, you need to look for it in the style.css file for the parent theme. Once you’ve found the rule in the parent stylesheet, you know what selectors to use to make changes in the child stylesheet.

For example, on one of my blogs, I didn’t like the way the h3 headings in the parent theme looked. I found the rule for the the h3 headings. In my parent theme, it looked like this:


.entry-content h3,
.comment-content h3 {
	font-size: 10px;
	letter-spacing: 0.1em;
	line-height: 2.6em;
	text-transform: uppercase;
}

I didn’t like the size, or the line height, and I didn’t like the uppercase. To overrule that, I used the same selectors, but I put a new rule for those selectors in the style.css file in the child theme folder.


.entry-content h3,
.comment-content h3 {
	font-size: 16px;
	font-weight:bold;
	line-height: 1.6em;
	text-transform: none;
}

I got bigger, bolder, headings that weren’t all uppercase! Just what I wanted.

More Advanced Customizations

Other parts of your theme can be customized as well. You might want to add something to the header.php file or the functions.php file. This can be done by adding the changed files to the child theme folder. If the parent theme is updated, none of your changes in the child theme folder will be lost. The WordPress Codex has more information to help you to move to the advanced level.

Note that a child theme can only be used when a blog has WordPress installed on its own domain. Child themes won’t work for themes hosted on wordpress.com.

GoDaddy Managed WordPress is built from the ground up for maximum performance, security and ease of use. Click here to experience the difference.

An Accessibility Primer

How do we achieve accessibility? Follow these simple guidelines.

wheelchairicon

Create web sites that

  • Use web standards
  • Use semantic HTML: POSH
  • Integrate accessibility from the start of a project
  • Are POUR

What is POSH?

  •  Plain old semantic HTML
  •  The Hypertext Markup Language is meant to format text into semantic elements. Most HTML tags are self-describing, that is, the tag itself describes the semantic meaning of the text it is meant to format.
  •  Make sure the HTML elements that content is placed in are really describing the content. Use heading tags (<h1>, <h2>, etc.) for headings. Use list tags for lists. Use table elements properly.
  •  There are only a couple of exceptions to the semantic nature of HTML: the generic container elements <div> and <span> do not have semantic underpinnings.

What is POUR (or the WCAG 2.0 guidelines)

Perceivable

  • Provide text alternatives for any non-text content so that it can be changed into other forms people need, such as large print, Braille, speech, symbols, or simpler language.
  • Provide alternatives for time-based media
  • Create content that can be presented in different ways (for example, simpler layout) without losing information or structure.
  • Make it easier for users to see and hear content, including separating foreground and background.

Operable

  • Make all functionality available from a keyboard.
  • Provide users enough time to read and use content.
  • Do not design content in a way that is known to cause seizures.
  • Provide ways to help users navigate, find content, and determine where they are.

Understandable

  • Make text content readable and understandable
  • Make web pages appear and operate in predictable ways
  • Help users avoid and correct mistakes

Robust

  • Maximize compatibility with current and future user agents, including assistive technologies.

Facebook Updates Login and Adds Anonymous Logins

Facebook announced changes to logins. With the Facebook login to apps, the new version gives people the option to pick and choose what information apps get and what information gets shared back to Facebook.  This will help preserve privacy when using Facebook logins on other websites and in apps.

You can also login anonymously. This login lets people log in to apps without having to remember usernames and passwords, but it doesn’t share personal information from Facebook. So far, Anonymous Login is only set up in a few places, but its use should increase over time.

Anonymous Login from Facebook on Vimeo.

Also changing in the coming weeks will be a new app control dashboard inside Facebook’s settings. Using the new controls, people can see a list of apps they use, manage specific permissions, or remove apps entirely.