A Closer Look at Codecademy

Online programming tutorials like Lifehacker’s tutorial on coding are great places to start if you want to learn the basics of coding for free. The only problem with tutorials is that they often don’t give you much of a chance to learn by doing, and any programmer will tell you that a programming language is best learned through experience.

Up until recently, you could find a few, free interactive education courses to help you learn how to code, but many of these courses weren’t designed with pedagogical best practices in mind. Many of the available open source courses were designed by programmers, for programmers who want to brush up on some of the finer points of coding. Fortunately for those with limited background knowledge of computer science, there’s a relatively new and highly accessible online education program called Codecademy. Codecademy is an interactive series of web-based courses on coding.

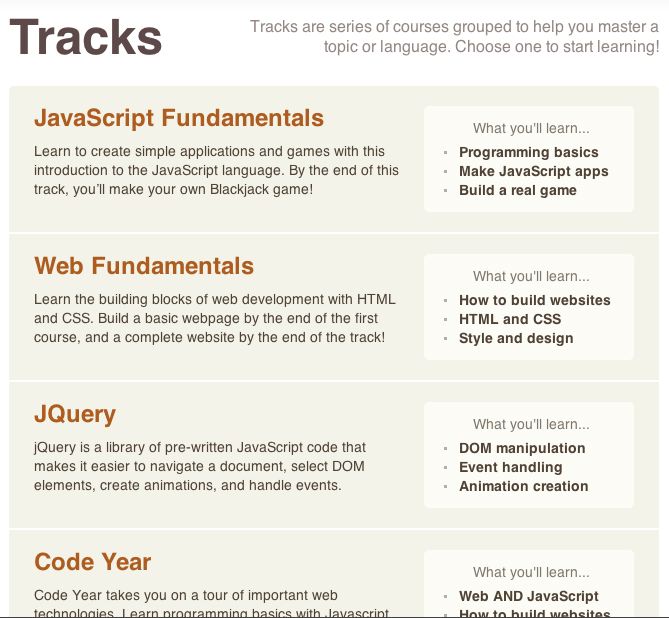
Web Teacher has already devoted some attention to Codecademy in a previous post. If you’re interested in learning more about this coding education program before you sign up, here’s the scoop on the JavaScript track.

code academy tracks

Codecademy begins with the very basics of coding in JavaScript, and it uses scaffolding techniques to ease learners into some of the most complex coding tasks. The education program’s user interface is simple and well-designed. There are instructions on the left side of the screen, and there’s a terminal in the middle of the screen where you practice coding according to lesson instructions. At the end of each lesson, you’re given a “test” that requires you to complete coding tasks based on what you’ve learned. As the lessons progress in terms of difficulty, it’s best to take notes. Some users have mentioned that the courses go by a little quickly. So, make sure you give yourself some processing time between lessons and refer back to your notes when you’re tested on difficult concepts.

Staying motivated while taking any sort of online course can be a challenge for many learners. Luckily, Codecademy does provide some incentive for users to stick with its education program. Users of the program are given trophies and points as they complete lessons, and these trophies and points are prominently displayed on their profiles. If a few of your friends are also learning how to code, it can be fun to compare how many trophies and points you each have and try to compete to finish lessons first.

Codecademy undeniably makes learning how to code in JavaScript easier. However, it should be noted that learning to code is intrinsically difficult for many beginning programmers. If you’re self-motivated and dedicated to completing all of Codecademy’s lessons, however, you’ll be a JavaScript guru in no time.

About the guest author: A freelance writer and blogger hailing from the great state of Texas, Melissa Miller specializes in writing about the education field. If you’re considering pursuing an associate degree online, Melissa’s many posts on the subject can help light the way. Email her at melissamiller831@gmail.com with any feedback.
 

Review: The CSS3 Anthology: Take Your Sites to New Heights

affiliate link to Amazon

The CSS3 Anthology: Take Your Sites to New Heights by Rachel Andrew is from SitePoint (2012). This is the 4th edition of this popular book, so you may be familiar with how it works. In case you are not, the book uses a question and answer type of organization. You might have a question such as, “How do I create rollover images in my navigation without using JavaScript?” The book suggests the question, then provides the answer. The answer includes screen shots, both HTML and CSS code examples and some discussion as to how the solution works and how it might be modified.

The title makes no mention of HTML5, but many (not all) the HTML code examples in the book have been updated to HTML5.

The book is organized into chapters, with the questions and answers in each chapter fairly well described by the chapter title, although on one or two occasions I wondered why they chose a particular chapter to explain something. Chapters cover broad topics like CSS basics, text, images, navigation, tabular data, forms, positioning and layout. There’s also a very good chapter on cross-browser techniques.

Chapter names aside, if I were looking for an answer, I would start with the index. For example, when you look for “opacity” in the index, you find it mentioned on 7 different pages. To find the solution I wanted regarding opacity, I would check those 7 pages.

If you are looking for quick solutions to your CSS3 questions, this book probably has them. You’ll find background gradients, multiple backgrounds, text-shadow, box shadow, multicolumn layouts, various polyfils, media queries, transforms, opacity, RGBa transparency, and more included.

I’m not sure this is the book you want to read straight through to learn CSS, but it definitely is a book you would find valuable in implementing new CSS3 properties into your website. And you can learn a lot from reading it straight through, should you do that.

Summary: Easy to use resource with answers to your CSS3 questions.

A review by Virginia DeBolt of The CSS3 Anthology: Take Your Sites to New Heights (rating: 5 stars)

Disclosure: SitePoint provided a review copy of this book, but my opinions are my own.

Useful links: iPhone Printer, test that QR code, Lauren Ipsum

iPhone printer? Yes, but it’s pricey. Since rumors about Facebook creating its own phone keep appearing, and since Facebook now owns Instagram, a printer that works directly from your phone may only be the first of many.

Speaking of phone technology, Digital Inspiration tells you about an app that lets you examine the URL in a QR code before you actually let it take you there.

Here’s a great book to help your 5-12 year old kids learn programming concepts: Lauren Ipsum.

Book a Flight with a Tweet

Sure, you could make a charitable donation using Twitter. But you couldn’t really buy anything. Until now. Media Bistro’s All Twitter blog tells us about TweetAFlight Lets You Book Flights on Twitter.

TweetAFlight is a site that has solved the problem of how to book a flight on Twitter. TweetAFlight is selling airline tickets, but you can be sure that if this system works, everything plus the kitchen sink will soon be for sale on Twitter.

chirpify
Illustration from Chirpify

Here’s how it works

So simple, so simple. . .

  1. Follow @TweetAFlight on Twitter
  2. When you see a tweet for a flight you want, reply with the word “BUY”.

That reply message to “buy” gets processed by Chirpify. (On Twitter, it’s @Chirpify.) Chirpify is a new Twitter Commerce platform that handles transactions from Twitter through PayPal. Chirpify doesn’t just sell for giant companies like airlines. You can use it yourself to sell items. It can be used for donations. It can be used to buy any item which someone offers you on Twitter. Stand back, because I’m sure you can imagine how this is going to explode.

It doesn’t cost you any extra cash to make a payment for something with Chirpify. It’s like any other payment you make through PayPal. The sellers pay a small percentage – between 2 and 4% to process the sale. Chirpify even works with retweets – an important point for those who might be collecting donations.

Not Just Plane Tickets

As GeekWire points out in Chirpify lands $1.3 million to sell music and concert tickets through Twitter, it isn’t just plane tickets going on sale. According to ChrisTeso, Chirpify started out to be for musicians. From that humble beginning, and with funding of only $1.3 million, I believe something huge this way comes.

The notion of selling anything on Twitter has got to make millions of people’s eyes light up with new money making ideas. It may also make millions of people want to run from Twitter as quickly as possible. Which camp are you in?

[Note: Cross-posted at BlogHer.]

Weebly Goes Mobile

I reviewed the web site creation tool Weebly in 2008. See A Look at Weebly.  Now they’ve created an app for iPhone that lets you create posts from your mobile. It’s really simple and may appeal to many people who want to do easy blogging and posting while on the go. Since I already have a history with Weebly, and because they’ve managed to survive and thrive all this time in a competitive niche, I thought a look at their app was in order.

The app is free from the App Store.  It works on iPhone, iPod touch, and iPad and requires iOS 4.3 or later. I’d head to the App Store first. If you go to the weebly site, they ask for your mobile number before they send you a link to the app. You may ultimately have to give them your mobile number to use the app, but I found it really annoying that they asked for it even before you’d had a chance to take a look.


Google+ Redesign News and Tips for Using Google+

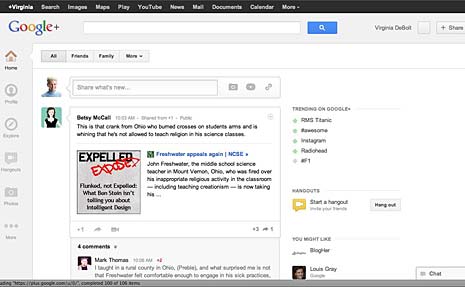
Google+ made some changes and upgrades last week and I thought it was time to take a second at this site, both to see what’s new and to discuss helpful features. Google announced the changes on the Google blog in Toward a Simpler, More Beautiful Google.

google+ new look


If you are familiar with Google+, you can see from the image the look has changed to something sleek and minamalist. Google describes it as “more functional and flexible.” Google touts the new navigation, saying,

  • You can drag apps up or down to create the order you want
  • You can hover over certain apps to reveal a set of quick actions
  • You can show or hide apps by moving them in and out of “More”

A few of the other changes (you can get the full list in this video) are easier ways to join conversations, ways to track activity around conversations you’re following, and a page just for Hangouts. Some of the menu items pop out for more precise options, such as the Photo menu.

google add photos pop out


The Profile page changed to include something that bears a whole lot of similarities to the Facebook Timeline, with a large image. Take a look at how She Geeks describes the Profile changes in Google Receives a Fresh Redesign that You Might Like.

The redesign raised the hackles of developers whose apps broke, and engendered a mocking meme about whitespace. You can explore those issues in Google Introduces a Familiar Redesign and Google Angers Developer with Google+ Redesign.

Getting the Most from Google+

After several months using Google+ it remains way down on the list of social networks I check regularly. Perhaps I’m not following enough people to get the value I was hoping for from it, but I don’t find it especially important – yet. I think the Hangouts feature is terrific, but people I’d like to share a Hangout with (for example, my book discussion group) are not all on Google+.

Even so, I’ve learned some tricks that help me get the most from Google+. They seem almost secret, because they are a bit hidden. If you take a second look at the site now to check out the new look, perhaps these tips will help you get more out of Google+.

The first almost-secret is circle volume control. It’s a bit tricky to find.

google more menu


Start in your stream with the Home button. Then pull down the More menu and select a circle. I picked my circle called BlogHers. That will bring posts from BlogHers to the top of my stream. And, it brings up a volume control slider to the right of the page.

volume control slider


Use the slider to determine the amount of volume as a percentage of your total stream you want to see from the chosen Circle. I find this really helpful. I recently added a circle called Women Who Work in STEM, and, wow, those women are talkative! I can turn the volume down on those posts, while getting more volume from my BlogHer circle.

The second almost-secret is Sparks. A Spark is basically a saved search. I searched on the keywords “web design.” You see the results immediately, of course, but when the results appear, a button to “Save This Search” also appears. Click it and your search is saved.

I saved another search, too. This one was for “social media.” Now, when I’m on the Home page looking at my stream, I can find both those searches in the More menu and check for new search results anytime.

saved searches in menu


Your Reaction?

As with any change, reactions to new design are mixed. It’s interesting to use Google+ to search for “Google+ redesign” and see the mixed reactions. My personal reaction is, “Oh, Google+ changed.” What’s your response?

Honestly, I’m more excited about using features that were there all the time like the Volume Control and Saved Search. The new design is just “Okay. Thanks for letting me know.”

Editor’s Note: All screen captures from Google+ by Virginia DeBolt. Cross-posted at BlogHer.

Photo Editing in Flickr Goes to Aviary

Flickr recently announced that Picnik (set to disappear completely from Flickr by April 19) will be replaced with the HTML5 based image editing tool Aviary. In case you missed the subtle nuance of the phrase HTML5 based, I remind you that means it will work in iOS.

Aviary is a plug-in that works in mobile devices and in the desktop browser. Aviary also works with Facebook. Flickr promises it will be faster than Picnik.

Some Flickr accounts can see Aviary in place right now. Using it is similar to the way Flickr worked with Picnik. Here’s a look at how to use Aviary from inside Flickr.

Step by Step with Aviary in Flickr

Here’s a photo I took of Leslie Jensen-Inman and Jeffrey Zeldman on the stage at SXSW in March. It’s on Flickr and ready to edit with Aviary.

Step One: In the Actions pull down menu, select Edit photo in Aviary

Edit Photo in Aviary menu item
Image ©Virginia DeBolt

Step Two: Agree to give Aviary access to Flickr

agree to aviary
Image ©Virginia DeBolt

You’ll only have to do this the first time you use Aviary.

Step Three: Edit

edit window in Aviary
Image ©Virginia DeBolt

The image opens in Aviary’s editing window. You see a row of tools across the top of the window. The options include such things as enhance, crop, and brightness. Note the arrows. Click the arrow and you find additional editing tools.

menu 2 in Aviary
Image ©Virginia DeBolt

With these tools you can do things like hide redeye or blemishes and sharpen.
You can even draw.

Step Four: Save

save in Aviary
Image ©Virginia DeBolt

When you save, you can choose to change the photo’s title, add new descriptions or tags, determine who can see the photo. Most importantly, you decide whether or replace the existing photo with the edited one or to save a new copy of the image.

After you click Save, you are right back in Flickr, ready to move on.

Are You Happy with the New Photo Editing Tool?

I’ve used Aviary for a long time and watched it grow. I’m happy to see it integrated with Flickr. It’s a good replacement for Picnik – easy to use and robust enough to do the job. I’m pretty happy about this development. Are you happy with it?

Note: This article is cross-posted at BlogHer in a slightly different form.