The optgroup in HTML select forms in Dreamweaver

I recently showed how to use optgroup in HTML select forms. Those instructions were for hand coders. Today’s instructions show you how to make a small select form with optgroups in Dreamweaver. This is what the finished form element looks like in the browser.

browserOptgroup

Here’s how you do it if you use Dreamweaver. The following screen shots are from Dreamweaver CS4, but previous recent versions of Dreamweaver will work in a similar way.

In Dreamweaver, start by selecting the Forms category from the Insert panel. Choose the icon for List/Menu. Fill in the id for the form element and give the menu a Label. Select Attach label tag using ‘for’ attribute. If you don’t see this accessibility window, you need to go into your Preferences and select all the Accessibility options you can to automatically appear when appropriate.
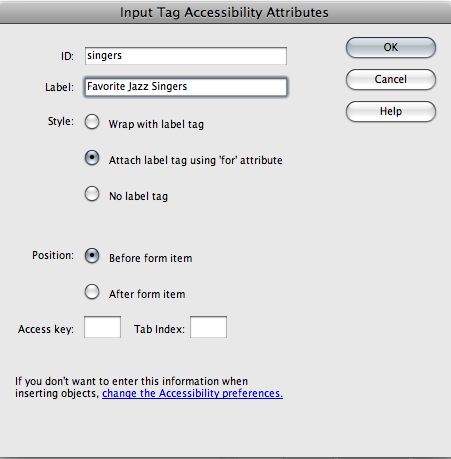
InputTagAccessibilityAttributes

When the form element appears in the document, select it and click List Values in the Properties panel. Add the various labels and values for your select menu. Click OK.

ListValues

Select either Split or Code View to look at the code. At this point, you have the following code.

selectCodeView

I changed the value for name to “fav.” Dreamweaver assigns the value “singers” to both name and id automatically. It’s okay to change the value of name, but be sure that the value of for and the value of id are exactly the same.

Dreamweaver doesn’t have an icon for optgroup in the Form panel. So you have two choices. You can go into Code View and type the optgroup tags in your select element. If you are comfortable doing that, it’s the quickest way to make it happen.

If you don’t like typing in Code View, here are the steps. You still need to see the code. Use Split View. Highlight the three options that are women. (You can see an image of the men’s names highlighted below.) With the women options highlighted, Choose Insert Tag. In the Tag Chooser window, select HTML tags > Forms > optgroup. Click Insert.

insertOptgroup

You will be asked to create a Label for the optgroup. Type Women. Click OK.

tag-editor-optgroup

Repeat the process by highlighting the options for men in the code.

highlightMen

Again, choose Insert Tag. In the Tag Chooser window, select HTML tags > Forms > optgroup. Click Insert. This time, when the Tag Editor for optgroup appears, type “Men” in the form and click OK. The completed select menu looks like this in Code view:
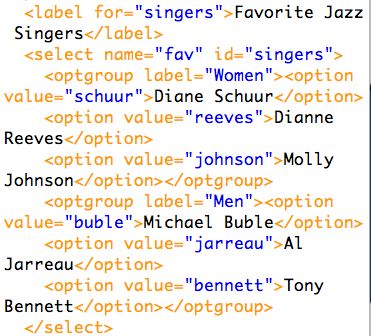
completed-select-menu

You’ve finished inserting the optgroup, so you can click back into Design view and complete your form in Design view.

The optgroup in HTML select forms

You are probably familiar with form elements that list all 50 states or numerous country codes. These forms are constructed with select menus. Using optgroup, you can create categories within a select menu to help organize the menu. Here’s an example of a select menu that lets you pick favorite jazz singers, with the choices organized by gender. The optgroup label appears in the menu when it is displayed on a web page.

<label for="singers">Favorite Jazz Singers</label>
<select name="fav" id="singers" multiple="multiple">
<optgroup label="Women">
<option value="schuur">Diane Schuur</option>
<option value="reeves">Dianne Reeves</option>
<option vlaue="johnson">Molly Johnson</option>
</optgroup>
<optgroup label="Men">
<option value="buble">Michael Buble</option>
<option value="jarreau">Al Jarreau</option>
<option value="bennett">Tony Bennett</option>
</optgroup>
</select>

The select element allows for more than one choice with the attribute multiple="multiple". When allowing more than one choice, it’s wise to instruct your users about how to do that. A brief note that more than one selection can be made by holding down the Ctrl or Cmd key while selecting is all that is needed.

If you are not a hand coder and need directions for how to use optgroup in Dreamweaver, see this post: The optgroup in HTML select forms in Dreamweaver.

When should we teach microformats?

Since I read Microformats Made Simple I keep toying with this question: when should we teach microformats?

Odd that I didn’t think about this when I read Microformats: Empowering Your Markup for Web 2.0 or when I recommended a couple of articles by John Allsopp in this post.

My only excuse is that I was concerned with learning to use microformats myself for a period, but by the time I read Microformats Made Simple I was ready to think about sharing the information.

Here’s what I’m wondering. Do microformats have a place in a standards-based curriculum like the InterAct Curriculum? When done right, microformats use both valid and semantic HTML. Should they be introduced as a best practice when working the way through a web design 101 or web development 101 or basic HTML class?

For example, when a student learns to create a hyperlink, should the rel attribute be included with that instruction as a standard practice?

If I taught a student how to make a link to their home page, should I teach them to do this:

<a href="http://www.webteacher.ws/" rel="me">Web Teacher</a>

or this?

<a href="http://www.webteacher.ws/">Web Teacher</a>

Or perhaps the web design 101 courses need a module or a couple of lectures or a single lecture/lab on microformats in one concentrated dose? When should a student learn to make an hCard? Or to use any other microformat?

What do you think?

Using CSS background-image to style links

There are many ways to style links with CSS. One possible way is to use the background-image property to distinguish the various link states.

Link states are represented in CSS by selectors involving the a element, which targets an HTML a tag in a link like <a href="somepage.html">Some page</a>. The potential states of a hyperlink are link, visited, hover, active, and focus. In CSS rules, these selectors are written as:  a:link, a:visited, a:hover, a:active, and a:focus.

Let’s assume you have a set of images suitable for link backgrounds. These images might involve color changes, show small arrows or glyphs, or various other small but meaningful graphic enhancements meant to indicate link states. Further, assume the images are named hoverbg.jpg, linkbg,jpg, and visitedbg.jpg.

Start with the normal link state, a CSS selector that will style all your links until overruled by a subsequent rule.

a:link {
background: url(img/linkbg.jpg)
}

This will put your background image behind the text of you links. The next rule in your CSS should style visited links.

a:visited {
background: url(img/visitedbg.jpg)
}

Any visited link will now have a different appearance to your user.

Finally, add a rule to style the links while they are in the hover state or in the active state. You can use a group selector for this.

a:hover, a:active {
background: url (img/hoverbg.jpg)
}

This rule will style the link while is is hovered over or being clicked.

You could add a:focus to the group selector in the last rule, although I’m not sure it would be that useful in this scenario. Focus states are important to users browsing with assistive devices and visual difference like background images may not be relevant to them. Focus states are important to users who use the keyboard to move from link to link.

This is not a review of Microformats Made Simple

I’m not going to review Microformats Made Simple here because the author is a friend, I’m mentioned in a few places in the book, and I could not write an unbiased review. Add to that the fact that I think the author is awesomeness electrified, one of the women in tech to keep an eye on, a brilliant front end developer, and my bias shows in an even brighter shade of sunshine.

But I do want to talk about the book. So, accept that I’m biased. My remarks are not presented in a review wrapped up in my normal hReview microformat; there are no affiliate links to the book on Amazon; there is no cover photo. I’m just talking here.

Microformats Made Simple (New Riders, 2009) is by Emily Lewis. The book is exactly what its title says, a source of information and code that make using microformats dead simple to use and easy to understand—all wrapped up in the logic of semantic HTML and web standards.

If you care at all about semantic HTML, SEO, accessible data, reusable content, or web design you need to read this book. I think you do care about those things. I suggest you read the book sitting by your computer, because you are going to want to implement microformats as you read through the chapters. It’s so easy and the benefits are so clear, you can’t read the book and not want to use the information. In many cases you can add microformat data instantly as you see the code examples provided and apply the concepts to your own sites.

When New Riders contacted Emily about writing a book, she indicated that she wanted to use her natural language. She didn’t want to write like a technical writer. I think she set a new standard for an accessible, personal writing style and tone in a technical book. Examples in evidence:

Can I get a “Hell, yeah!” for meaning and semantics?

I’d call it crap, but I’m trying to be dignified here.

So now you know your first compound microformat. Proud? I am. You are already becoming my favorite person.

If you are teaching HTML or any beginning level web development class, you could add microformats to your course with almost no effort by adding various microformats at appropriate moments as students learn new material. This book would guide you in that effort.

My biased opinion is that this is a terrific book.

Useful Links: Facebook in class, HTML+RDFa, Windows 7

100 Ways You Should be Using Facebook in Your Classroom has some interesting ideas scattered through the list. You might find something you can use there.

HTML+RDFa is a first draft of the W3C’s proposed mechanism for embedding RDF in HTML. Review by those interested is invited by the W3C.

That thud you hear is people dumping Vista and installing Windows 7. Here are several Windows 7 reviews:

Styling column backgrounds and table borders with CSS

With a bit of HTML and a bit of CSS, you can add alternating column background colors and borders to your data table. Here’s an example of such a data table, ready to be completed:
table with alternating column background colors

To create the background color effect for the columns, use the <colgroup> element in your HTML. Here’s how it would look. (Incomplete table code is shown for brevity.)

<table summary="My friends names and contact information.">
<colgroup></colgroup>
<colgroup class="odd"></colgroup>
<colgroup></colgroup>
<colgroup class="odd"></colgroup>
<tr>
<th scope="col">Name</th>
<th scope="col">E-mail</th>
<th scope="col">Twitter</th>
<th scope="col">Facebook</th>
</tr>
. . .

I used a class named “odd” to designate every other column in the colgroup code, but you could use any class name you considered appropriate for your needs. You could also apply a class to the colgroup elements I ignored, so that a color value for the background could be applied to them as well.

Then you simply create a CSS rule for your class in the stylesheet. As simple as:

.odd {
background: #cff;
}

To create the border lines for your data table, you only need CSS. You’ve already got all the HTML needed. Each of the elements in your table need a border rule. In the table shown in the image above, that includes table, th, tr, and td elements. I styled them all with a group selector:

table, th, tr, td {
border: thin solid #000;
}

There will be a space between the table cells. If you want to eliminate those gaps, use the border-collapse property in your rule.

table, th, tr, td {
border: thin solid #000;
border-collapse:collapse;
}

You can apply these concepts to make your data tables easier to understand visually.