I recently showed how to use optgroup in HTML select forms. Those instructions were for hand coders. Today’s instructions show you how to make a small select form with optgroups in Dreamweaver. This is what the finished form element looks like in the browser.

Here’s how you do it if you use Dreamweaver. The following screen shots are from Dreamweaver CS4, but previous recent versions of Dreamweaver will work in a similar way.
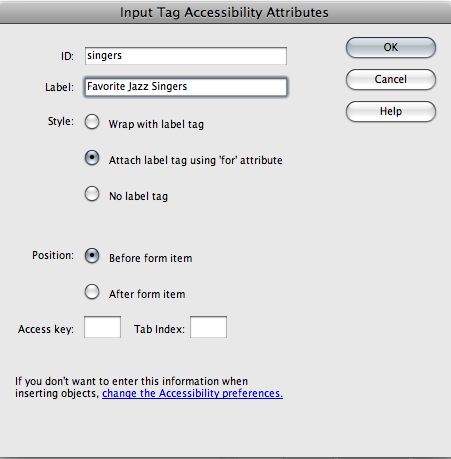
In Dreamweaver, start by selecting the Forms category from the Insert panel. Choose the icon for List/Menu. Fill in the id for the form element and give the menu a Label. Select Attach label tag using ‘for’ attribute. If you don’t see this accessibility window, you need to go into your Preferences and select all the Accessibility options you can to automatically appear when appropriate.

When the form element appears in the document, select it and click List Values in the Properties panel. Add the various labels and values for your select menu. Click OK.

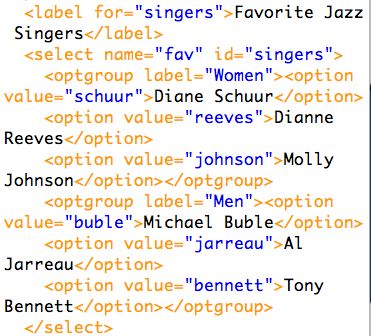
Select either Split or Code View to look at the code. At this point, you have the following code.

I changed the value for name to “fav.” Dreamweaver assigns the value “singers” to both name and id automatically. It’s okay to change the value of name, but be sure that the value of for and the value of id are exactly the same.
Dreamweaver doesn’t have an icon for optgroup in the Form panel. So you have two choices. You can go into Code View and type the optgroup tags in your select element. If you are comfortable doing that, it’s the quickest way to make it happen.
If you don’t like typing in Code View, here are the steps. You still need to see the code. Use Split View. Highlight the three options that are women. (You can see an image of the men’s names highlighted below.) With the women options highlighted, Choose Insert Tag. In the Tag Chooser window, select HTML tags > Forms > optgroup. Click Insert.

You will be asked to create a Label for the optgroup. Type Women. Click OK.

Repeat the process by highlighting the options for men in the code.

Again, choose Insert Tag. In the Tag Chooser window, select HTML tags > Forms > optgroup. Click Insert. This time, when the Tag Editor for optgroup appears, type “Men” in the form and click OK. The completed select menu looks like this in Code view:

You’ve finished inserting the optgroup, so you can click back into Design view and complete your form in Design view.