Tip: Three steps to a two column CSS layout

I certainly did not originate this method of creating a two column layout, but I will summarize it for you. Step one: create a wrapper or container div and give it a CSS rule: position:relative.

#wrapper {
position: relative;
}

I’m temporarily ignoring the need for headers and footers. You can adjust for them. Step two: position the first div (we’ll call it #nav) using position:absolute. The numbers you use for top and left determine whether this column will be on the right or the left side of your page. Give the div a suitable width for your navigation.

#nav {
width: 20%;
position: absolute;
left: 10px;
top: 40px;
}

Step three: Use a margin to create a second column with another div (we’ll call it #content). If the nav is on the left, use a wide margin-left. If the nav is on the right, use a wide margin-right. Assign a width that allows for the nav.

#content{
width: 70%;
margin-left: 25%;
}

Tip: The Dreamweaver 8 toggle displaying CSS Styles

I recently updated a page for the first time since moving to Dreamweaver 8 and noticed some changes in the way Dreamweaver 8 deals with absolutely positioned layers in Design View. It threw me off for a while and I asked for help. Al Sparber, from Project Seven came to my rescue with the advice to toggle off style rendering in Dreamweaver’s Design View. I’m now wildly happy over the toolbar that allows you to toggle style rendering! Here’s the whole story.

The page I updated uses a Project Seven scroller. This is an artist’s portfolio page on a site (hgwinn.com) that I’ve updated happily with several versions of Dreamweaver for a few years. Previous versions of Dreamweaver used an icon for each absolutely positioned layer that allowed me to select an individual layer for editing.

DW 2004 MX shows yellow layer icons

The absolutely positioned layers are shown as selectable with a yellow icon in Dreamweaver MX 2004.

Design View with layer selected

In Dreamweaver MX 2004, when I selected the first layer icon on the left, I could edit that layer and none of the other layers appeared in Design View.

This is a complex page and I normally worked on it in Code View, except that I liked changing the image size measurements in Design View. There is a small spiral arrow that can be used to insert the correct measurements for a new image on the Property inspector. But to be able to use it to change the dimensions for a newly inserted image, one must be able to select the image in Design View. Using the icons I just described, selecting the image was a simple matter.

Now move on to Dreamweaver 8. I open the portfolio page in DW 8 for the first time and things look very different. There are no icons, every layer is visible and it’s impossible to select parts from layers individually.

Portfolio in design view in dw 8

Notice the tag selector at the lower left. In Dreamweaver 8, a div is selected. I cannot drill down into the text or image elements of the div in order to edit anything.

Now, I’m not in a panic, because I normally work on this stuff in Code View, but remember my penchant for changing to new image dimensions with the Property Inspector. I have a very hard time remembering numbers, and going from an image size display readout in Fireworks, to typing width and height attributes in an image tag in Code View is a multi-step process for me. I have to go back and forth several times to get the numbers right. I really want to be able to insert a new image and just press the wonderful little icon on the Property inspector that will set the image size to the right dimensions for me.

So I call out to my cronies in the web world, and Al Sparber notices my question. (He’s always on the alert for folks having trouble with Project Seven products. They have great support for their products in the Project Seven forums, by the way, but that isn’t where I was asking my question.) Al tells me about a new option in Dreamweaver 8 that I hadn’t discovered yet. There’s a toolbar for style rendering. It’s at View > Toolbars > Style Rendering.

Style Rendering toolbar

This toolbar is such a fine addition to Dreamweaver 8! It allows you to render the page in Design View for screen media, print media, handheld media, projection media, tty media, tv media, or—the icon on the far right—toggle displaying CSS styles.

When I use the icon to toggle off CSS style rendering I get a linearized view of the page that is super easy to edit.

DW 8 with CSS rendering off

Each layer is now individually viewable, I can select text or image (note the tag selector at the lower right) for quick editing, and I am happy, happy, happy.

Now I’m using this toolbar extensively to work with other pages in other sites where Dreamweaver’s Design View was getting in my way. And don’t forget the value of being able to render your pages for print styles or handheld styles using this toolbar. I consider this advancement in WYSIWYG tools to be one of Dreamweaver 8’s best new features.

Tip: Getting Text Edit to open an HTML file in plain text

I heard from a reader the other day who complained that she could not get the files from the CD that accompanies my book to open on her Mac. I thought perhaps a few tips about using Text Edit, the Mac OS X text editor, in plain text mode might be in order.

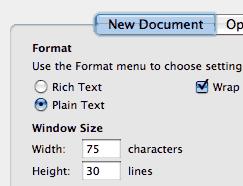
There are two settings to check in the Preferences. First, look at the New Document preferences. If you want to use Text Edit to write brand new HTML files, you need to set this Preference for “Plain Text.”

New Document Preferences

If you don’t want to create new original HTML files, but merely want to open HTML files that you find on the CD (or elsewhere) in plain text, then click on the Open and Save button. Here you want to check “Ignore rich text commands in HTML files.”

Open and Save Preferences

Text Edit will both read and write HTML files successfully if you set the preferences this way.

Tip: What is a Wrapper Div?

One of the listservs I read regularly recently had the question posted, “What is a wrapper?” This question is sometimes phrased, “What is a container?” An answer provided by Paul Novitski was so clear that I thought it might be a useful tip here. With Paul’s permission, here is his response to the question.

A wrapper is an element, commonly a div, that encloses one or more other
elements in the HTML markup, e.g.:

<div id="wrap">
<h1>Headline</h1>
<p>Paragraph</p>
<p>Paragraph</p>
</div>

The purposes of wrappers are several, including:

  • to group elements semantically, for instance to separate page heading
    from body text from sidebar from footer.
  • to group elements cosmetically, such as with a surrounding border or a
    common background image or color.
  • to group elements in layout, such as to keep them all in the same column
    when columns are floated next to one another.
  • to enable special positioning, as when a wrapper is given relative
    positioning in order to contain child elements with absolute positioning.
  • to make it more convenient to specify elements in CSS and JavaScript by
    referring to their parent, without having to id or class each child
    element, as in:
    div#wrap h1 {...}
    div#wrap p {...}
    var aKids = document.getElementById("wrap")
    .childNodes;

    (Note: the var above should all be on one line)

Some special effects require several nested wrappers, such as when a box is
given rounded corners. UPDATED: This is no longer true since the border-radius property has become supported in most browsers. A border for any element can be given rounded corners using border-radius.

Tip: Using a backslash in CSS hacks and workarounds

You may have seen the backslash character ( \ ) used in CSS, often without any explanation as to why it works.

I’ll give you an example, and then I’ll explain when the backslash can be used. In setting a width for a div, you see CSS rules like this:

#somediv {
width: 682px;
w\idth: 680px;
border: 1px;
}

This example uses two width declarations because of IE5.x for Windows’ broken box model. (In Quirks mode, IE6 also uses the broken box model. In Standards mode, IE6 uses the correct box model.) Assume the width you really want for the div is 680px. Adding a 1px border on every side of the div adds two pixels to the width of the div in a browser with a broken box model. A standards-compliant browser includes the 2px border in the 680px specified for the div. As you might have guessed, this use of the backslash to set width is known as the box model hack.

It is important to notice that the declaration (w\idth: 680px;) for compliant browsers follows the declaration for broken-box-model browsers in the Cascade. Here’s what happens. IE.5x reads the width: 682px; declaration but skips over the following w\idth:680px; because it doesn’t understand a property with a backslash. A compliant browser reads the first declaration, but implements the second declaration. The compliant browser implements the second declaration because it does understand a property with a backslash, and because the declaration is later in the Cascade.

Why does the backslash work? It turns out that the backslash is an entirely legal character. In fact, it will not stop your CSS from validating. There is one restriction on its use. You cannot place the backslash before any letter used for the hexadecimal color codes–a,b,c,d,e or f–or unwanted effects will befall you.

Tip: Eliminate unwanted whitespace in Internet Explorer list rendering

Sometimes Internet Explorer adds unwanted whitespace and separates list items in unwanted ways. The way to fix this is to remove all the whitespace from the list items in the code. There are two options for how to do this.

The first way is to “break” the closing list item tag like this:
<ul>
<li>list text</li
><li>list text</li
><li>list text</li
></ul>

The second method is to run all the list items together in one string like this:
<ul>
<li>list text</li><li>list text</li><li>list text</li>
</ul>

Additional note: there is information about the cause and cure for this problem at the CSS Creator Forum that doesn’t involve writing mangled HTML code.

Tip: Using Insert Div Tag in Dreamweaver MX 2004

Dreamweaver MX 2004 introduced a new command called Insert Div Tag. I have complained a bit about the fact that the DW MX 2004 books I’m reviewing here don’t explain much about this valuable new command. This new command seems like a big deal to me because it helps develop the structure needed to use CSS, but several books don’t even mention it: the proverbial elephant in the living room sort of command. Well, instead of complaining, I decided to write a brief tutorial explaining a little about it. I hope you find it useful.

Note: This technique involving the insert div tag applies to Dreamweaver 8 and Dreamweaver CS3 also.