HTML5 Video in Dreamweaver CC

I saw a nice post at Overdigital called HTML5 Video Guide – All You Need to Know for 2014. It contains information about current codecs, streaming, mobiles and more.

As I was reading it, I realized I hadn’t looked at Dreamweaver CC to see how it handled the video element. Dreamweaver 5.5, which is what I had before CC, had no help at all with HTML5 video element insertion. You could do it in Code View, of course, but no WYSIWYG help.

But many things in Dreamweaver have changed in CC. I took a look.

There’s now an HTML5 Video command in the Insert menu. Once you have a placeholder for the video element on the document page, the Properties Panel gives you all the options you need to manage your video in Document View.

Dreamweaver property panel for video element

The Properties panel includes places to add alt sources in different codecs, specify the poster image, the Flash fallback file, fallback text and more.

I’m happy to see that Adobe has given Dreamweaver users such an easy tool for using HTML5 video. This can only help with the adoption of the video element across many sites.

Creating Transitions in Dreamweaver CC

The CSS interface for Dreamweaver CC is very different from the classic look seasoned users interacted with for years. In Dreamweaver 6, CSS 3 transitions were added to Dreamweaver’s design tools. The interface works approximately the same in Creative Cloud (Dreamweaver CC).

I added a transition to a couple of images on my home page. Here’s how I did it, step-by-step.

1. Find or create a selector

I decided to apply the transition to a couple of book images. I added class="grow" to the images, so I could target them easily for the transition.

Also note, while you’re looking at the code for the image, that it is set at a width of 30%. My goal is to change that width with my transition rule.

class selectro

2. Add a new Transition and Target a Rule

In the CSS Transitions panel, I clicked the familiar plus sign to add a new transition. A dialog window opened. I’ll go through it in steps.

target rule

First, pick the target rule. Every rule you have in your style sheet is shown in alphabetical order. Like any other field in Dreamweaver, you can type directly in the field if you want instead of looking through your list of styles. I selected the .grow rule to target.

3. Transition On

The next choice is to decide when you want the transition to happen. You can see the options in the image. I picked on hover.

hover

4. Pick the timing

You can use the same transition for all properties, as I have here. You can also set different transitions for different properties if you want to have more than one transition happening in the same event.

You set the duration and delay in either seconds or milliseconds. The timing function offers ease-in, ease-out and others as well as the one I picked, linear.

duration and timing

5. Pick a property to transition

Click the plus in the Property area. As I mentioned, my goal is to change the width of the image during the transition, so I picked the property width. I set the end value to 40%.

Finally, I picked the stylesheet where I wanted it saved, and clicked Save Transition.

width

And You’re Done

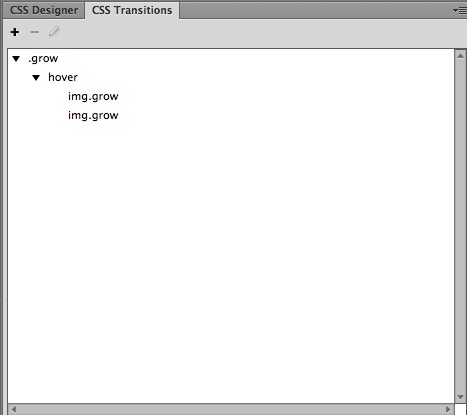
That’s the transition. It’s now shown in my CSS Transitions pane. I can edit it at any time by double clicking the transition.

transitions list

This was added to my stylesheet. The necessary vendor prefixes are included.

css rule

In a browser, you see the normal display to the left, and what happens on hover to the right in this composite image.

results

You’re now ready to make transitions happen in Dreamweaver Creative Cloud.

See Also: Dreamweaver and CSS in Creative Cloud

Dreamweaver and CSS in Creative Cloud

The Dreamweaver wizard that Macromedia came up with way back in the dark ages to create CSS rules stayed with us and served us well for a long time. Because of all the CSS 3 properties that have come along since then that weren’t anywhere in the wizard, things were due for a change.

In Dreamweaver CC, we see the change. It looks really different, but you’ll get the hang of it quickly.

Choose Your View: Compact or Expanded

The panels are where the action is now, not in a pop-up dialog box (the well-known wizard). You can view the CSS tools with the panels in either compact or expanded view. Here’s compact.

DW CSS panels

Start from the very top menu bar, you see the pull down menu to choose compact or expanded.

In the panels area, you see I’ve collapsed the Files panel. Immediately under that you see two CSS main panels, CSS Designer and CSS Transitions. With the CSS Designer panel active, under it you see the list of style sheets in my particular example. There’s a panel for adding @media queries (collapsed in this image) to your stylesheets, just in case you didn’t start your project by creating layouts for various media sizes from the outset. There’s a Selectors panel which looks quite familiar, and a Properties panel which is very changed. We’ll look at the fine details about the Properties panel in just a bit.

First lets see the expanded view.

DW expanded view

In the expanded view, you have space to see a smidgen of the Files panel and a whole lot more of the crucial Properties panel. You can see that this particular example has a style sheet called basic.css selected, and within that a rule for body is highlighted.

It only takes a second to switch from Compact to Expanded view, but you’ll find it almost impossible to do anything useful to your CSS in Compact view, so that’s a good thing.

The Properties panel

At the top of the Properties panel, you see icons for the categories of CSS you will want to work with. The first category is layout. I’ve pasted two sections of this together into one long image, so you get an idea of what you would see if you scrolled down a bit in the layout category.

layout

You have a box model thumbnail for setting margins, padding, and positioning. Below that you set float, clear and more. You can set individual properties for margins and padding by typing any amount and unit you want, or you click the linky looking symbol in the center to set them all at once.

If you continue to scroll down, you come to the Text category, or you can click the Text icon at the top.

text

Below what you see here for text, you also have a text-transform, letter spacing, alignment  and other text choices.

border

Border is the next category. Scroll below what you see here and there’s a border-radius area with a nice thumbnail representation of your choices for each corner.

background

Background is the next category. The box-shadow options will show in the next image.

other

The last category is Others, which includes list options.

On the right of the Properties panel title bar, you see a box called “Show Set.” If you select that, you see only the properties that have been assigned a value.

Nothing looks the same, but it only takes a second to grasp what the new symbols represent.

float and clear

Look at the icons for float and clear, for example. You click the icons to set up float:left, float:right or float:none. With clear, you click the icons for clear:left, clear:right, clear:both, or clear:none. It’s different looking, but what you’re doing is pretty obvious once you figure out how the interface is organized now.

After you’ve worked on your CSS, change the view back to Compact while you’re working in the Document window so you have more space on your screen.

See Also: Creating Transitions in Dreamweaver CC.

Useful links: Zoom, Open Glass, Fluid Grids, MOOC Credits

Browser zoom great for accessibility is from AlastairC and talks about the accessibility difference in normal browser zoom and text only zoom. This is really interesting and can affect your results when zooming to 200% to test your WCAG compliance.

Open Glass Project Demos how Useful Glass Can be if You’re Visually Impaired. Fascinating and creative project.

Tom Green has a series of tutorials fluid grids on Dreamweaver 6 at WebDesign Tuts+, including the first in the series: Fluid Grids. He has downloadable files. And his video doesn’t blur out frequently the way the one I showed you from Adobe/Lynda.com did the other day. Thanks, Tom, for letting me know about these terrific tutorials.

A Universities offer of credit for a MOOC gets no takers. The article has ideas about why.

Using Dreamweaver Fluid Grid Layouts (video)

This is an Adobe/Lynda.com video tutorial explaining how to use fluid grid layouts in Dreamweaver 6. It blurs out during scrolling or fast movement sections for me, which is a bit distracting, but doesn’t affect the information you want to learn.

Adobe TV has a number of excellent tutorials for learning Dreamweaver 6 online, some with downloadable files to let you work along with the tutorial. This is the only one I’ve seen that has the blurring issue.

I recommend these videos for anyone who is transitioning from versions of Dreamweaver prior to 6, since the interface in DW6 is quite different from previous versions.

Useful Links: DW CC Tutorial, print styles, POUR

Dreamweaver CC is very different in appearance and interface from previous versions. The wizard for creating CSS rules that has been in place since the early days is gone. Here’s a nice tutorial with downloadable files that will walk you through some of the ways to use the software interface now while making a simple web page.

Tips and Tricks for Print Style Sheets brings you up to speed on the modern way to create print styles.

Pragmatica11y: Teaching Accessibility Core Rules is the second of two posts by Dennis Boudreau. The first boiled down the rules for the Perceivable part of POUR. This post covers the Operable, Understandable, and Robust aspects, simplified down to the ‘core.’

Adobe Creative Cloud

I knew I’d have to do it sooner or later as long as I continue to teach. And, oh, wow, look at my Dock:

CC icons in dock

That’s a lot of Adobe software, folks.

I joined Adobe Creative Cloud the other day. I downloaded everything! It took a long time, and my computer was burning hot when it was over.

I don’t know what half of these programs do. I must spend some time mining the video tutorials on the Adobe site to learn about all the fantastic new stuff I can now do. Jeepers, maybe I’ll be able to export SVG from Illustrator soon.

One piece of good news. The Extensions Manager version I had before CC crashed each time I tried to use it. The new one works. I have two extensions managers now, one for CS6 which works on Fireworks CS6, and one for CC, which works on everything else.

The biggest piece of news is that I completely misunderstood what Adobe Creative Cloud was all about and how it was going to work when I first wrote about it. So here’s the deal for those of you who are confused like I was.

When you purchase a plan, you can download any or all the software you paid for access to. It will automatically be updated (which I sincerely hope happens faster than the initial downloads). You can keep files on your own computer, you can back them up to the cloud, you can share them with collaborators – or not. You can install on more than one computer, too.

You see that curvy looking icon at the far left in the image of my Dock at the top? That’s the CC icon, and it works like going to the app store for updates (well, until iOS 7 kicks in). You see what you have downloaded, what’s available for download, and what’s ready to update in a handy little interface.

You don’t have to be connected to the Internet to use the software.